


Hi, I’m Natalie. Some people call me Nat. That’s cool, too.
I make stuff. A lot. It’s part of who I am. I’m a crafty person, not by choice, but by DNA, I think. I love Mod Podge, but I also knit, sew, paint, and am dabbling in lots of other things. That’s not all you’ll find here, though. I love food, I’m in the process of completely readjusting my eating habits, and I love a good (easy) party. All this is to say, my blog is about stuff I do.
I am also a mom to three cute kids, ages 5, 3, and nearly 1. You’ll see them sprinkled throughout in my posts. They come first, so you’ll rarely see me post daily, and that’s okay with me. I’d rather give you good stuff than fluff.
You’ll find that I’m part Martha-Stewart-Wannabe, and part realist. Nobody can be Martha except, well, Martha herself. And while I love perfection, I also love the process of getting there just as much. I screw up a lot, and will be sure to let you know so you can laugh- either at or with me, depending on the scenario.
To get you started at Crafting Crazy, here are a few of my favorite posts:
I recently painted my kitchen chairs.
I Mod Podged fabric onto a table and it looks rad.
My hall closet is always organized (even if the rest of my house looks like crap).
I made our duvet cover. It took forever.
If you’re still reading, some other things I can tell you:
- I’m a bit accident prone. Okay, I’m a klutz. Glue guns and signs are particularly dangerous for me. Yup. You read that right. Oh, and car doors.
- I love my husband. His name is Michael. He tolerates me, and my propensity for crafting and injuring myself on a regular basis, with grace and patience. He is amazing.
- I love my kids. If you’d like to check them out, you can read my family blog here.
Thanks for checking out my blog, and if you have one yourself please let me know so I can pass on the karma. 🙂
I’m working on this whole “having your house rise up to meet you.” Yeah, I know. I’m a Martha fan and an Oprah fan. Big time. So sue me.
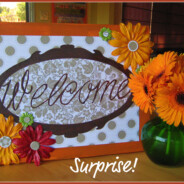
I’m also in the process of revamping our front door… area. Stoop? Threshold? Doorstep? You know- where people arrive. More to come about that, but this whole revamp got me to thinking that aside from all the plants we have, there isn’t really anything to welcome people to our house. I’ve seen little welcome signs around in stores, but none of them have the flair or look that I want. I want them to be just the right size, not too big, not too small. I don’t want them to be boring, but I don’t want them to be too busy because no one wants to be distracted while walking into someone’s house (especially me- I’m accident prone).
So I set to work. Have you seen JSIM? If not, get your booty over there- Cathe gives you free stuff all. the. time. I recently downloaded some alphabets from Cathe here and chose one to use for my sign (Cathe- you rock!). I don’t own a Cricut or a Silhouette (someday?), so it was either print something on the printer or make it myself. I was feeling artsy and techy, so I opened up Photoshop and put together “Welcome” from my favorite alphabet that Cathe gave me, and printed it out on a plain piece of 12×12 piece of paper to create a sort of mock stencil. This did not look “pretty” when it printed- since it was a stencil it was just a functional thing. You’ll see it below in the pictures.
Here are the other supplies you need (see list below the collage):

- Canvas or other crafty surface to put everything on (picture frame? bottom of a box? endless possibilities)
- pencil & permanent marker; also a good eraser if you are sloppy like me
- paint brush with a thin tip
- Brushes and applicators for your Mod Podge and paint
- Mod Podge (if your sign will go outside you’ll want some Outdoor MP)
- Acrylic Paint in color(s) of your choosing
- Paper flowers (mine are by Bazzill Basics)
- buttons for flower centers (doesn’t matter what color they are- they will get covered up)
- coordinating scrap/craft paper (take the easy route- I chose two that were already paired together)
- any other scrappy/crafty things you’d like to use.
- paper plates for Mod Podging
- newspaper for covering your work surface
- scissors- I used two kinds (see photos) a basic pair and a small, extra-sharp pair for the detail work in the frame I cut out
- Clear Acrylic Spray- something to coat the finished product
Steps:
Paint the canvas a color you like. Paint most of it, but you don’t have to paint the very center. (I had orange and brown left over from this and this, so I mixed them up to get a nice fall orange going.) Set aside to dry.

Mod Podge the top of your flowers, being careful not to MP them to whatever they are sitting on. I really just did this to stiffen them up a bit in case the humidity gets to them over time.

Cut your background paper to the size you want. Since my canvas was 11×14, I trimmed mine to about 10×12 (I think).
Choose a shape for your Welcome paper. I was going to do an oval, but then while in Photoshop saw this oval frame and liked it better. I printed the frame on my Welcome paper and cut it out. The frame wasn’t as dark as I wanted because of the pattern on the paper, so I went over it again with a dark brown marker. You could also just trace a shape you like, or draw one freehand, but I’m not that symmetrical in my drawing.

I turned the Welcome that I printed out from JSIM into a sort of pseudo-stencil. I trimmed it up and traced parts of it on the paper, and then connected the dots.
 Then I went over it in an archival pen, and then I painted it with paint so that it would look more handmade/crafty. Here you can see I’m halfway done with the paint.

Get out your Mod Podge! I used two types here- basic Matte MP for the first stuff, and then Outdoor MP for the last layer. I did the two papers, background and Welcome, just on the back first, and then let them dry for about 30 minutes or so. Before they set I went over them with a ruler to make sure there were no bubbles. Then I came back and did the top of the paper.
Flowers: I placed the flowers on with MP. Then I covered buttons with the same papers and MP’d them to the flowers. This was all very messy, which is fun or awful depending on your level of mess tolerance. Since my children were not present, I loved it. Had they been present, I probably would have received 5 phone calls and had to settle 3 tantrums. Instead, I ModPodged in silent bliss. It was great.
After all of that dried, I did the layer of Outdoor Mod Podge. Note: Outdoor Mod Podge is THICK stuff. Work carefully and slowly. Spread out what you have before glopping on more- especially with the flowers.
After all of that dried, I sprayed the whole thing with some clear acrylic spray (outside) and let it dry overnight. Add a couple of hangers and some lovely brown ribbon and voila! A welcome sign!
 Here is what it looks like hanging on the wall. I don’t think the ribbon will stay this long, but I just wanted to see it hanging to give you an idea of what it looks like because…

Giveaway Alert!
Here comes my surprise….

I made TWO! One for me and one for one of you lovely readers. My plan is to make one of these for each season and a few holidays (so yes, there will be more giveaways here at Crafting Crazy). It was really fun to make, and if I can brighten my doorstep and yours, who can lose, really?
How can you win this Welcome Sign? Read on:
This Giveaway includes:
1) Polka-Dot Welcome sign pictured above
2) Two brass hangers for hanging (I will place them if you like, or send them along with the sign in case you aren’t sure how you want to hang it)
3) Lovely brown ribbon for hanging- you can let me know how long you’d like, or just let me guess how much you need.
How to win? Share the love. Lots of ways to win:
#1: Leave a comment. That’s all. Just leave me a comment- say hello, I like your sign, I hope I win, anything. Just leave a comment.
#2: Look at the bottom of this post. See the little bar down there that says “Sharing is Caring?” Share my post somewhere from that bar, then come back here and tell me which one you used and if it was cool, annoying, easy, hard, etc. This is a new tool and I don’t want to use it if it’s frustrating. If something doesn’t work, tell me! I need help with this one, so even if it doesn’t work, just tell me and that counts as an entry.
#3: Do you tweet? Follow me on Twitter (button is up on the right) and let me know via a comment. If you already follow me (thanks!) then just let me know in a comment.
#4: Subscribe to my blog via email. In the right side bar near the top you’ll see a box that says “Subscribe to Crafting Crazy Via Email Updates”. Enter your email, and leave another comment to let me know.
#5: Use my RSS feed button (the little orange thing at the top right) or the Google button (below the orange thing) to add me to your blog feeds somehow. Let me know- leave another comment.
I will announce the winner on Friday, August 20th and will send the winner the sign to hang. I would love it, if you win the sign, to send me a picture of it hanging in/on your house so I can see where it ends up. If you blog, I’d love a mention on your blog, too!
Can’t wait to see who wins!
I realize that sewing machine maintenance is not the most amazing thing to post about, but it might help someone out, so I thought I’d post just in case.
I was having some problems with my sewing machine. It kept jamming the thread when I was sewing simple things, and it was getting quite frustrating. I emailed my friend Kari at Handmade Mommy to see if she had any thoughts on why it would be jamming up. I call Kari when I really need help- I feel so lucky to have a friend who is not only smarter than me about sewing but also generous in sharing her knowledge. Kari suggested I try a new needle, but I already had a new needle, so at least I knew that couldn’t be it. Then I had a revolutionary thought: consult the manual.
I pulled it out and looked in the back. I love manuals that are written by people who don’t speak English. They crack me up. Thankfully this part of my manual is very well done (most of it is, really). It said to clean things up a bit, so I flipped to the section that told me how to take off the needle plate and opened up my machine. I laughed heartily when I took it off because this is what I saw (sorry for the big photos, but I thought it would be nice to see how bad it was in there!):

Then, when I removed the bobbin case, THIS is what I saw:

No wonder I was having problems! And do you recognize that color? Gee, I wonder if all of that copper-colored lint might have come from this project. I used a small, soft paint brush (with no paint, of course) to get all of the lint out. Now it runs like a champ. Here’s the cleaned up “after” photo:
 Much better! I imagine one is supposed to do this often, so I will be checking underneath my machine’s “hood” a little bit more frequently. Hope this is helpful to all my fellow sewers!
Eek! Update: I emailed Chris at Pick Up Some Creativity and shared my post with her. She then so nicely posted this on her blog- I’m in a list with some pretty amazing bloggers! Thanks, Chris!
(Side note: this is part of my 31DBB Challenge- we’re supposed to write an opinion post. I’m way behind, but better late than never…{I want to win a free camera} So here’s my opinion. If you’re new, yes, this is a crafty blog, but I have something to say that has nothing to do with crafting- hope you like it!)
I have lots of friends in my “real world” (as opposed to my blog world) asking me about blogging in the last few weeks. It’s interesting to see the reaction people have to why a person blogs. As someone who became an avid blogger (via my family blog) and general internet nerd during my year leave of absence from teaching (ah, that was such a nice year), I can see how people who work full-time, or even part time, sometimes look at blogging as, well, rather strange. When you take a step back and look at what blogging is, it’s overwhelming. If I take too much time to think about hundreds of people hopefully/possibly reading about me, what I do, or what I think, it’s kind of crazy.
There seem to be lots of opinions out there, and most of them are strong. Here are some of the vibes I get from various people I have spoken to about blogging, and also my response to those opinions. No one has ever outright said these things to me- they are just vibes I pick up on from time to time.
“It’s dumb.” (or any other negative adjective you’d like to insert- stupid, useless, waste of time, etc.)
What I think: It’s not dumb. Perhaps if you find a blog you don’t relate to it might seem dumb or irrelevant, but it’s only irrelevant to you- it might be someone else’s inspiration.
************
“You can’t really make a living blogging.”
What I think: Heh. Oh really? Oh reeeeallllly? Then why does Darren exist? Why does Dooce exist? You can make a living blogging. But it’s something you have to work your arse off doing. Is it a living you’d choose? Most likely not since you don’t think it’s possible. But hey- to each his/her own, I say. I’ve spent a lot of time on my blog this summer and hardly anyone is looking at it….yet. I hope that will change, but even if it doesn’t it will make me happy to leave a mark in this huge cyber-world. If it makes me happy, what do I have to lose?
************
“You have too much time on your hands.”
What I think: Nope. I definitely don’t have too much time on my hands. I have two children, I hope to have a third in the near future, I’m going to be teaching in a few weeks, I’d like to workout on a regular basis, I have a house to organize and keep clean, and I also have this little thing called a relationship with my husband. I’ve got plenty to do. But I like blogging. So sue me.
************
“You’re addicted to the internet and social media.”
What I think: Hell, yeah, I’m addicted to the internet and social media! I love it! If you don’t, more power to ya. I still get out of the house, I have a social life, I have friends (hi, friends!) and I think I’m doing okay balancing my life as best I can. But I love Facebook for the way it allows me to keep up with old friends and new, I love Twitter even though I have yet to fully grasp it, and I love blogging because without it I would never have found inspiration to start sewing and keep making stuff I like.
I’ve often seen comments on friend’s Facebook status that make fun of people who take the status update to an extreme. Sometimes, being the rather sensitive person I am, I’ve wondered if they are commenting about me (then I remember that I rarely post about going to the bathroom or what I just ate- unless I’m out to dinner and having something ridiculously delicious- then I share). But at the finish of this post I shall worry no longer. I’m going to own my blogging and social media loving self and live. it. up. I think it will be advantageous when my kids are older- when they are talking about the latest and greatest things on the internet I may actually know what they are talking about. And I will meet so many people on this journey of mine that I can’t possibly sit around and wonder if everyone approves or disapproves. It’s official: I don’t care.
What is blogging to me? It’s a way to record my journey and to share it with other people. It’s a way to reach out across the country and the world to say, “Hey! Check this out!” I have so many friends who blog not for the recognition but to just write, get their thoughts out, and have a place to reflect on their life. Blogging is the new form of a diary for so many people. It will track my children’s lives, it will track my learning process, it will keep me sane in many ways. I have so many things I think about- blogging is where I process and manipulate my brain.
So, what interesting comments have you received about the blogging world? Do you care what your friends/family/colleagues thing about your blog? Your interest in social media? I’d love to hear from you!
Shhhh… I’m trying to concentrate.
Well, the time has come. I have gotten as far as I can on my own, so the next couple of days are going to be spent two places.
Here, because I need to get crackin’ on some projects:

And here, because I need to get some schooling on the innards of my blog:
 I love WordPress. But I do not know WordPress well enough. We shall see if this book can change that. Time will tell. Wish me luck!
Don’t you think throwing a nice party is sort of a craft? It’s definitely an art form, and it’s hard to do well, I think. Anyhoo…..
My mother was adamant about a lot of things when we were growing up (I’m the youngest of 3, and yes, I was worried they would forget about me so I acted out just for the recognition). One thing that I still thank her for today is the fact that she taught us such good manners (as I’m typing this I’m hoping that no one sends me a comment that reads: “Yo, you were totally rude to me and this is what you did….”). We always said please and thank you. I’m finding myself doing the same with my kids- maybe it’s in the DNA. In this case, it’s a good thing.
As a working mom, one of the hardest things to do every week is leave your kids somewhere. Doesn’t matter where it is, or even if you think it’s actually good for them to go to childcare/preschool/etc. It’s just hard to leave them. When we found our kids’ preschool/childcare place, it was a huge relief because we LOVE their “school.” The classes are small, the teachers are amazing, the two women who run the place are flexible and helpful, and they still consider me the boss of my children.
I told Michael that I wanted to celebrate them this summer by giving the kids’ teachers a thank you party. It was so fun to plan something like this. If you’ve been around since I started this blog you may remember this post about asking their food and drink preferences. This also sort of built the excitement for them- they were all a-twitter the day or two before the actual party. I thought I’d share a few of the things we made for them.
Pear Rosemary Martinis
You can find the original recipe for these here at Epicurious. It had really great reviews, and I actually made these a few years ago for a friend’s bachelorette (ah, those were the days), so I knew they were yummy. However, I had to alter the recipe a bit to make it work for us. The original recipe calls for pear brandy. Pear brandy is a bit expensive, and with everything else we were doing I needed to cut some corners. So instead, I used some regular run-of-the-mill brandy, regular (nice) vodka, and some Absolut Pear. My version of the martini is at the bottom of this post.
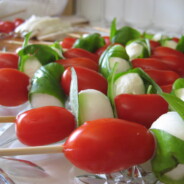
Caprese Kabobs

These are fairly self-explanatory, so I’ll just post pictures. I got our little mozzarella balls at Trader Joe’s along with one of those huge basil plants. I covered them with wet paper towels so the mozzarella cheese wouldn’t dry out before the party, wrapped the platter in saran-wrap, and popped it in the fridge. Then I drizzled them with a slightly sweet balsamic vinaigrette right before serving. Yum- and so pretty. I liked this because it wasn’t too heavy before a nice, hearty Italian dinner.
Tiramisu

I also found this on Epicurious, here. It was delicious! This was my first Tiramisu. My biggest challenge was finding the lady fingers, but once I found those we were good to go. Warning: do not be troubled by the filling while you are making it. I tasted it and was concerned that it didn’t taste good, but something about sitting overnight in the fridge and setting makes it taste oh-so-wonderful the next day. And it was great because it was one less thing to worry about the day of the party. I used Sweet Marsala instead of dry. Tasted fine to everyone! And I used a trifle dish because it just sounded pretty and many commenters on the site said it made for nice presentation, so I followed suit.
Lastly, a couple of other pictures. One is of my china. We pulled it out, and I’m so glad we did because I. Love. My. China. I remember calling my mother when we registered, worried that I was picking a rather fancy one that was a bit more expensive. My mother said something like, “Do not pick a cheaper china just to be nice. Pick the one you want and people will buy it. You will regret it if you pick one you don’t like just to save people money. If they don’t want to buy you china, they will buy you something else. Get the china you want.” She said this, of course, in the way that all mothers have- the guilt fell away and I got my china. Thanks, Mom!

Finally, I took this picture towards the end of dinner- we turned out the lights except for some distant lamps, and lit the candles. It was so relaxing to eat in a dimly lit room- and everyone looked stunning. 🙂 That’s my amazing husband in the background. I am totally in love with him, by the way.

So, who can you thank? How would you thank them? This was so much fun, and I think we’ll do it again next summer, for shizzle. Nothing can replace confidence in those who care for your children, and thanking these wonderful ladies felt good. Great. Awesome. And I got toasty-buzzed in the process- who can beat that? Okay fine- I was a bit hungover the next day.
Here’s that Pear Rosemary Martini recipe (my version):
1 cup simple rosemary syrup (see below)
375 ml (1/2 bottle) plain vodka
375 ml (1/2 bottle) Absolut Pear vodka
3 tbsp Brandy
5 tbsp. fresh lemon juice
For the syrup: boil one cup of water with one cup of sugar, stirring to dissolve. Once it boils, reduce to a simmer for 2 minutes, adding 4 rosemary sprigs while simmering. Once it’s cool to the touch, remove the rosemary. Completely cool before adding to the liquor.
Combine all of the liquids in a pitcher and place in the freezer for at least 3 hours. Before serving stir it up. If you have time and a mesh strainer, it’s good to strain the pulp out of the lemon juice. Garnish with a sprig of rosemary. Caution: these go down easy and sneak up on you!
Man, oh man!
I am so thrashed! I have just spent oodles of time updating my widgets and categories. Still working on the categories.
I have ordred “WordPress for Dummies.” I feel like a dummy, so hopefully that will help. I have countless posts in my cue, and so many projects to work on. And school starts in 2 weeks. Yee. Haw.
Wish me luck! My next task is going to be to try and put Twitter and RSS feed buttons in my sidebar. Yikes!
Hello everyone!
If you have come to see me via my old url, craftingcrazy.wordpress.com, then you should know you are in the presence of genius. No, not me. My husband. I am so excited! In the last 24 hours I successfully claimed a new domain (crafting-crazy.com), set up my new blog with WordPress.org, and got all of the domain stuff switched over. Now I have to figure out how to get all of my posts (all 20 of them) over here and we’ll be good to go.
Thanks for hanging out with me! I’m so excited to start this new adventure!
Nat
Oh my. Oh my, oh my.
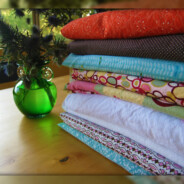
I went to the fabric store. I had some coupons. Oh dear.

I know- the white isn’t that exciting, but one has little polka dots on it- cute but simple. The other white is flannel- lining for more crayon rolls so I can make them whenever I want, for whomever I want. It’s all been washed. It’s all ready for creating. What shall I make? Only time will tell. I’m horribly excited and scared at the same time. But I love it. I stare at it. I nearly drooled on it.
Here are a few close-ups. I can’t wait to see where these babies pop up on this here blog- I wonder what they shall be….

This post could also be entitled “I love you, Ikea.” Or, “I love you, Mod Podge.”
The challenge: organize the hall closet.
A few weeks ago I was visited by my wonderful and oh-so-easy-to-talk-to friend, Jen, from Feng Shui Jen’s Way. Jen, you inspired me to get my house’s rear in gear (which I guess means my own rear in gear). I hope this post makes you proud!
Here is the hallway- it’s quite long. I apologize in advance for the photo lighting- there are no windows, therefore not a lot of natural light going on. You can kind of see the closet on the right in this photo- it’s one of those old-school, folding door closets with narrow shelves that don’t hold anything very conveniently. Great for my type-A personality.

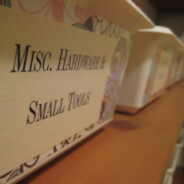
Here’s the closet “before” (embarassing, I know):


You may notice the white tubs with the lovely pink sticky notes on them. This was my half-a** attempt at organization. Downside to the sticky notes (aside from looking horrid) was that they fell off. Often. I don’t like baskets for things like this- they look nice for a while, then they collect dust, and then they fall apart. I needed and wanted tubs. Ikea rocks in the tub department- did you know?
Here are the tubs in their plain, boring format. The big ones are 5.99 and the little ones are 2.99. They are from the Slugis collection. See their specs here. (added: Apparently this line of tubs has now been discontinued. Insert maniacal crying here.) 🙁

I wanted to beautify them a little and also make them impervious to label-fall-offage. So I went to my paper stash and picked some favorites.

I created a template and traced it on the back of the paper so I didn’t have to worry about marker showing through. I used a nice thick permanent marker so I could cut precisely.

Then I started the Mod Podge process. First I painted the face of the tub with a layer of MP. I used a matte finish for this project because I didn’t want to be troubled with glaring labels whilst trying to find something. Immediately after applying the first layer I put a piece of paper on top. Then I slathered it up with some MP and let it dry.

I had a little bit of fun doing this- they were just so much nicer to look at after they were papered up. Even Michael liked looking at them. Aren’t they purty?!

Then I made labels for them. I made them all 6 inches across to help them look uniform, and used the same font throughout. I MP’d the labels on and then covered them with a layer of MP to finish.


The finished closet:

Can I say that I am in organization heaven? I love opening this closet and knowing where everything is. And the best part is that I didn’t fill them all up, so as we need to, I can put more labels on some.
BTW, this is the very first project where Mod Podge did exactly what I wanted it to. The paper did not bubble, it went on nice and smooth- hooray!
I am so excited that this was featured on Amy’s Mod Podge Rocks Facebook page! Yee haw!
I’m also going to link up to It’s a Blog Party’s Show Me How Party. Yay for links!
You could read that two ways:
A) Our family RULES! (As in, our family is totally rad- and it is)
or
B) Our family rules (As in, here are our Family Rules).
You pick.
Up there in my header there’s a list of Things I’d Like to Make. I need to add to it because I’ve seen some pretty awesome stuff in the last few days. One thing this 31DBB Challenge is doing is getting me to click around incessantly on the internet. Ridiculous. Often it’s worth my while, and occasionally I have to smack myself upside the head and get crackin’ on something of my own. In this case, it was the Family Rules.
I first saw this idea on one of my fa-fa-favorite blogs, The Pleated Poppy. You can see Lindsey’s fabric version here, and her friend Nicole’s version here. If you look at the comments on their blogs you will see that many others have made these and I am way late on this bandwagon. But better late than never, I say.
What I like about these, other than the crafty part, is that it’s a great reason to sit and think about what you want for you family. What are your core values? Get ’em up on the wall where you can see them daily. I collected ones I saw on the web and then altered and added to suit our tastes, and then showed them to Michael. He added some more and off I went. Actually, I didn’t have to get much- just the canvas and the orange paint.
Here is my finished Family Rules:

One thing I did differently is I totally copped out on the whole font thing. Many of the other blogs I read did their fonts by hand. For reals. I’m toooo lazy, and I’m also lucky enough to own a Canon i9900, which will print on a 12×12 piece of paper. Hindsight 20/20, I wouldn’t have done it quite the same if I were to do it again, but I am still pleased with the turnout. (And I’d still be totally lazy and print those puppies rather than do them by hand.)
I learned, however, that white ink is not Mod Podge friendly, or at least the white ink I used is not. See the one that says “Celebrate together”? I wanted it to *pop* on the paper which, though it’s hard to tell in the photo, is a shimmery paper. So I spent a ridiculous amount of time covering the blank ink from my printer with white ink, only to have it wipe off when I Mod Podged it. (Can you use Mod Podge as a verb? Not sure…) For some reason the other one I did, “Say grace and clean up after yourself” did not have the same problem, so it must have something to do with the paper. Oh well- it’s all shellacked now anyway.
Here are some close ups of the smaller ones- I had to get creative because I ran out of room, so this was my solution:


Here are all of our rules (they are not in this order on the finished product):
- Have fun, be silly
- dance, hug and snuggle often
- Celebrate together
- Say, “I love you” (lots and lots)
- Have an open mind
- Be kind and respectful
- Obey your parents
- tell the truth even if you might get in trouble
- share listen (these ended up as small ones so I separated them)
- Give your guest your best
- Mom & Dad: remember your wedding day
- hands are for hugging not hitting
- encourage your siblings… share in their joy
- there’s no such thing as too much reading
- never give up
- act responsibly, choose wisely
- keep your promises
- Use your manners- say please and thank you
- Say grace and clean up after yourself
- Ask lots of questions
- Use your creativity
- Try another point of view
- Remember that God is Father of us all
If I get some requests I will be happy to post the names of the fonts I used- I am a total font junkie which is part of the reason I loved this project. Such a nerd, I am. I would do it now but I have consumed far too much BV Cab, and fear I would list them inaccurately. 🙂
I love this- it adds so much color to our kitchen, and is one of a bunch of things I’ve been doing this week to get organized and get homey before the school year starts. I love coming home to a house with love and life, and I feel like I’m getting there. Just wait until you see my other project from this week…. coming soon!
About Natalie
 Life is crazy. Craft it well. Thanks for stopping by Crafting Crazy! I'm stumbling into a new sort of life after leaving a 12-year teaching career. More of a practical crafter, I'm trying to temper the perfection a bit. If I mess up, I’ll be sure to share- then we can laugh together. Here you'll find anything I like that makes my life better or fun. Crafts, of course, but also posts about food, home decor, exercise... whatever I'm dabbling in at the moment. I'm so glad you're here- thanks for stopping by!
 Content Brewing!
Ready to Rock?

I’m a Clever Girl!
SITS-stahs!

Chronically Distracted


This work is licensed under a Creative Commons Attribution-NonCommercial-ShareAlike 3.0 United States License.
Keep Up With the Crazy