


Hi, I’m Natalie. Some people call me Nat. That’s cool, too.
I make stuff. A lot. It’s part of who I am. I’m a crafty person, not by choice, but by DNA, I think. I love Mod Podge, but I also knit, sew, paint, and am dabbling in lots of other things. That’s not all you’ll find here, though. I love food, I’m in the process of completely readjusting my eating habits, and I love a good (easy) party. All this is to say, my blog is about stuff I do.
I am also a mom to three cute kids, ages 5, 3, and nearly 1. You’ll see them sprinkled throughout in my posts. They come first, so you’ll rarely see me post daily, and that’s okay with me. I’d rather give you good stuff than fluff.
You’ll find that I’m part Martha-Stewart-Wannabe, and part realist. Nobody can be Martha except, well, Martha herself. And while I love perfection, I also love the process of getting there just as much. I screw up a lot, and will be sure to let you know so you can laugh- either at or with me, depending on the scenario.
To get you started at Crafting Crazy, here are a few of my favorite posts:
I recently painted my kitchen chairs.
I Mod Podged fabric onto a table and it looks rad.
My hall closet is always organized (even if the rest of my house looks like crap).
I made our duvet cover. It took forever.
If you’re still reading, some other things I can tell you:
- I’m a bit accident prone. Okay, I’m a klutz. Glue guns and signs are particularly dangerous for me. Yup. You read that right. Oh, and car doors.
- I love my husband. His name is Michael. He tolerates me, and my propensity for crafting and injuring myself on a regular basis, with grace and patience. He is amazing.
- I love my kids. If you’d like to check them out, you can read my family blog here.
Thanks for checking out my blog, and if you have one yourself please let me know so I can pass on the karma. 🙂
Organization is the Spice of my Life
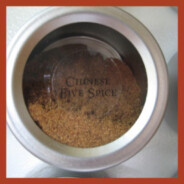
I’m such a nerd. I love it when things are organized. It makes me feel calm and like I might know what I’m doing in at least one venue of my life.
When we first got married, Michael and I bought a super-tiny condo near downtown San Diego. It was 1,000 square feet + a garage + a tiny storage unit. No patio, no outdoor area for a grill- nada. Our kitchen was neat, but not huge, and I wanted to keep our spices out of the cupboards. I found these containers at the Container Store and in the spices went. Even though that was our first place, and we are currently on our third, we still use these spice containers. I love having easy, fast access when I’m cooking, without hunting and pecking for common spices.

Originally I handwrote in permanent marker the names of the spices. However, at a recent visit to the Container Store I saw that they make nice stickers for them, so I redid them and am again in spice-organization-heaven. By the way, do you know how to erase permanent marker from plastic? All you have to do is color over it with a dry-erase marker and then rub it off with a paper towel- it all comes off. I had to do it a few times, but it totally worked. Love it!

We are going to be remodeling our kitchen in the next year or two, and I plan on still keeping our spices out. I love the colors, the names, and the access. We may put them on a backsplash instead of the fridge, but they will be out in the kitchen with us somewhere.
How do you organize your spices? I love seeing how people cook and what they do in their kitchens. If you do something with yours, please post a link with your comments- I’d love to see!
Well, here I am during the third week of school and already we are plagued with sickness. My son, Jack, and I are sick. He is a gross, snot-factory, cranky sort of sick. As mommy, I’m only allowed to be sick and still functioning in many ways, so I have been drugging myself with Sudafed, but yesterday was the last straw with that approach. Today my husband is home, Anna is at school, and I am presently waiting for an iTunes movie to download so I can veg in bed. While I wait for my movie, I thought I’d show you a little something I made.

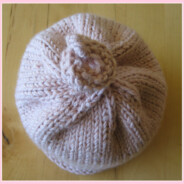
This is a little hat I knit. My friend and colleague (in that order) Stephanie, just had a little baby girl, Mackenzie. Mackenzie is adorable, and I worry that she may not need this hat because she has the most gorgeous head of hair a girl could ask for. But, babies need hats, right? And I started the hat before she was born with all of that hair, so either way, she was getting a hat.
I think this is my first knitting post on Crafting Crazy, so I’ll give you a little background on my knitting history. I tried to get a knitting lesson from my aunt a couple of years ago and we just couldn’t get it done. She started showing me how to cast on, but because a certain little miss would not eat unless I fed her during that holiday season, I headed back to San Diego with what one might call “knitters frustration.” For whatever reason, I really wanted to learn. I love yarn, I love handmade things, and yet I didn’t know how. So I hopped on YouTube and decided to teach myself with video tutorials. I guess it worked. I wouldn’t say I’m an expert knitter, but I have made several things. My next project, I decided, is going to be for me. I actually started a wrap that I think may take eons. Not sure if I’ll finish it or cave and switch to something else.
But back to Mackenzie’s hat… I made it with Debbie Bliss yarn- I just love Debbie Bliss. Anything Debbie Bliss is right up my alley. This is a thin yarn, so I actually double-knit it on size 7 circular needles. Just your basic hat pattern- I think I cast on 88 stitches, then knit in the round until it was about 5-6 inches long. Then I reduced and switched to DPNs when needed. My favorite part, though, is the top. Check it out:
 I got this part of the hat on Ravelry. If you haven’t discovered Ravelry, go check it out- it’s a great online community of knitters, and there are tons of free patterns. If you want to make this little “twirl top” then search “Twirl Top Baby Hat” and you’ll find it. It took me about 4 tries to get it right, but it was worth it- it makes it so stinkin’ cute. I can’t wait to see a picture of little Miss M in her twirl top hat. This last collage is just an ode to the stockinette stitch:
 There is something so visually satisfying in knit stitches that line up perfectly.
Welcome to the world, Mackenzie!
And what about you, dear reader? Do you knit? If you live in SD I’d love to teach you- I have tons of friends I’ve offered this to, and no one has taken me up on it….
I have begun a journey that I know will end on June 17, 2011. I have begun my final year of teaching. I have mixed feelings about it. I still like teaching in the moments with my students- I love giving children joyful experiences through music, I love the teachers I work with, and I think if I have a traditional job, I want it to be teaching. But my life has become one that I see needing a non-traditional scenario. I watch hundreds of moms throughout the week picking up their kids from school and walking home with them, and realize that I want to be that mom. I want to be able to pick my kids up from school, I want to be there when they have a bad day so I can give hugs and homemade cookies. I want to be there for them- it’s the most important thing. And so, with this realization last year, I told my husband and my principal (in reverse order) that this is my last year of teaching. I needed to name it and speak it in order for it to happen. That, coupled with my newfound love of sewing and creating things with love has instilled in me a lot of hope. I have no idea if we’ll be able to “make it” without me working. Rather, I’m sure we’ll “make it” but it will be a different kind of life. But it’s the life I want; my current life is hard to handle on a day-to-day basis. I can’t keep up with myself, my kids, my relationships…. the list goes on. I don’t handle being two people well. I want to be a good teacher, but it’s more important to me to be a good mom than anything else.
This blog is going to be sporadic while I’m working- I hope to keep up with posts. I am for sure unable to stop sewing- even if I want to take a break, an idea comes to me and I make it or else it eats at me. I’m also addicted to giving things I make to family and friends- it’s so much fun. So I hope that those of you who are reading this blog consistently stick with me- I can’t wait until I can consider myself a true SAHM and a full time blogger/crafter. I fantasize about it. No really. I do.
On to one of my latest projects. I posted here about my duvet cover that I made. Yeesh- I can’t believe I made that thing. I needed to finish it off with an accent pillow, so here it is:
 It’s that little green thing in the middle of the two white pillows.
To make the slipcover for this accent pillow, I followed this tutorial at Cottage Magpie that I found while hunting for tutorials. (That, by the way, is an addiction in and of itself.) This tutorial is GREAT- I wouldn’t change anything. I will probably never buy pillows ever again- it’s so much easier to pick your own fabric and make exactly what you want.
My pillow is 14×14 and a bit chubby, and because I wanted the fit to be just right I cut the fabric to be 15.5×15.5. This gave me plenty of wiggle room, and since the cotton is nice and crisp, it looks great. The only thing I did differently was the back two pieces are slightly bigger than what is recommended in the tutorial because I didn’t want there to be any pillow showing. So my two back pieces were 15.5 x 10.5. This gives you a nice, flat overlap in the back.
Here are some closeups:

It’s amazing what a little pillow can do! Now if we could just get the rest of the room finished…

This is a continuation of my original post in this series. I made some baby shoes way back when for Miss Clare. Then another friend of mine came to mind because she has a little girl about the same age, “V.”
When I made the first pair of shoes I was quite excited to make them. They were easy and quick. I also noted, however, that the buttons were hard to do when they were on Miss Clare’s kicking feet, so this time I decided to do snaps and elastics to give them a whirl. What did I learn? I hate sewing on snaps and I hate sewing elastic.
In Martha’s book they show the shoes with these perfectly sewn squares on the elastic. Can anyone tell me how they did that? Impossible. And the snaps? Oh, the snaps. They took forever, too. Once I finally got them on I was also left with ugly shoes, so I had to get a bit creative and cute them up. Here’s the finished product (I made two sizes since V’s measurements were a bit bigger than Clare’s):

And here’s a picture of the pink ones on Miss V’s feet:

I just love the heart on the bottom. And I put hearts over the snaps- that was part of the “cute them up” I was mentioning. My other feat with this project was sewing on the rick rack. In the book they tell you to use fabric glue. Using fabric glue on baby rick rack is like ironing a noodle. It’s very unproductive. So I sewed them on very carefully and it turned out much better.
My other accomplishment with this was that I altered the pattern in Photoshop to make them bigger for Miss V. Lots of accomplishments for such a small project.
In other news, I am back to work. Meh. So I will be posting less, I’m sure, though I can’t seem to stop sewing. On our first day we had to write what we needed to “let go of” on a paper plate and throw it in the trash. As we threw it away we were supposed to tell the rest of the group what was on the plate. My plate said, “I’d rather be sewing.” I made more pouches of my own design, so I’ll have photos of those up soon.
If you are awaiting paper from my post on the Beer Makeover, I am going to mail them tomorrow!
I am officially rambling, so I’ll sign off for now. 🙂
I’ve been eyeing the six-pack beer containers for a while. Not just for the delicious containers of summertime bliss, but for their revamp possibilities. Last week I did a huge cleanup in my office- reorganized everything and made my creating space much more useable and functional. Someday I’ll have a space like this or this, but that’s a long way off- right now I’m just happy to have a table and a closet.
When I was done I decided to get to work on the possibilities of this here beer container. (Keep your beer preferences to yourself. And if you haven’t tried this kind, give it a whirl- I love it.)

Here’s what you need if you’d like to repurpose your beer container.

- Beer container or anything else that holds cans/bottles
- Mod Podge (of course- it’s my new BFF apparently) and applicator (I like sponge brushes) (I have MP Hardcoat pictured- was thinking of using it and decided not to)
- pencil or marker for tracing
- Scissors (I’ve only pictured my big pair, but I ended up using a small pair for the handles)
- Paper that you love, love, love and have been afraid to use for something because it’s just so nice. Use it. What’s the point in it sitting there? There will always be more paper somewhere that you love.
- Any other cool, crazy accoutrements you’d like to add (stickers, letters, borders, zots, tags, etc.)
- Something to cover your worksurface. Come on, we’re using MP people.
Steps to take:
- Drink the beer (sorry, had to say it)
- Decide how you want to use the paper- what’s going to go on the front, back, sides, etc. I did not do this and ended up having to change things up. It still looks fine, but I was momentarily bummed.
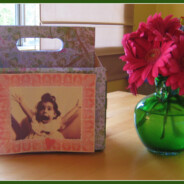
- Trace the different sides of your container on the paper and cut out. You don’t have to be too precise- the parts that show on mine are hardly noticeable, and it just adds to the character. I’ve had this paper on the left for years- I think, actually, for about 10 years. I always thought I’d use it to write a letter or something, but never happened. I just love her face and her arms. I couldn’t bear to throw it away. When I found it during my office reorganization I knew it had to be part of this- this way I can see her every day. Love it.

- Mod Podge it up. I painted the MP on the container first, smoothed the paper on top and then let it dry. Then I came back to it 15 minutes later or so and painted the paper with MP.
- Add your “extras.” I framed the girl in a frame I had that happened to look good with what I had. Then I used 3-D Zots to lift her up a bit from the box- nice layered look, I think. Here’s my finished product- I. Love. It.

Oh, but that’s just one side. Here’s the rest, and a shot of it on top of my shelf. The other side says, “Get your craft on!” The two small sides say “create” and “love.” I was going to do “create” and “inspire” but I ran out of R stickers. Oh well. Love is always a good thing, I say. I’m using it to hold my (what else?) Mod Podge, acrylic sealer and brushes. The slots are just a bit smaller than a large jar of MP, but since the cardboard is flexible it’s all good.

And now, here’s my little freebie for today:

I have 7 more pieces of this little lady. Would you like to use her? I’d love to send you a sheet- it’s just 8.5×11 paper, not thick at all. My only condition is that when you make something with her you link up to this post and let me know what you do with her. ‘M-kay? Pictures would be awesome. So, since I have 7 pieces, the first 7 peeps to post a comment will get her in the mail. Make sure I can find you, either leave your email with the comment (not in the comment- in the box) or make sure your contact info is current on your blog. That way I can get your address. If you don’t want the paper but still like what I did, feel free to still leave a comment- I love to see what people think.
I am linking up to It’s a Blog Party, C.R.A.F.T., and Making the World Cuter. Yee haw!
p.s. I apologize for my excessive use of parenthesis. (I can’t control myself.)
And the winner is…..
Congratulations Karen!!!

Karen has a blog, Aspiring Creations. I’m so excited! The best thing is that I just learned that Karen is right here in my hometown- how cool is that?
I can’t wait to see how this looks in (or on) her home. 🙂 This is such fun- I can’t wait to do the next one. I’m split between Halloween or doing one for the holidays. Maybe winter… oh dear. I need to start collecting major coupons…
And here’s a little tease about one of my upcoming posts. I got crafty yesterday with this little chica- she’s awfully fun, don’t you think?

I bought some fabric a while ago. If you’re reading this post at my actual site then you’re looking at the fabric because it’s in my background. I bought too much, for sure. I still have tons and tons left. That’s a good problem, though.
Many moons ago I found Noodlehead. I just have to point out, even though I’ve already mentioned it on my “About Nat” page, that my name is Natalie and my daughter’s name is Anna. Noodlehead is done by Anna (who just made an awesome dress) and her daughter’s name is Natalie. Neat, huh? 🙂
I found Noodlehead via my friend Kari of Handmade Mommy. Kari posted about doing Anna’s tutorial on L’il Cutie Pouches, and how they helped her overcome zipper anxiety. “Zipper anxiety?” I wondered to myself. “What’s zipper anxiety?” I recognized what a great little thing they’d be to have around, though, so I got some zippers (okay, a lot of zippers) and set to work.
I decided to make one just to try it out, and then I’d make more if I didn’t break my machine.
Moment of hilarity: I followed Anna’s tutorial precisely- it’s very well done. But once it came time to sew around the perimeter of the pouch I froze. “How do I go over the zipper? Can you sew over a zipper?” Enter: zipper anxiety. So what do I do? I called Kari, of course.
Kari, who was busy building a volcano with one of her adorable boys, took the time to say, “You’ll be fine. Just hand crank your needle through it and you’ll be fine.” “Okay,” I said, while in my head thinking, “For reals? I can sew over a zipper?” And yes, my friends, you CAN. It was fine. Though if Kari had not told me to do it by cranking my needle by hand I think I probably would have broken something.
So after I made the first one, I cut oodles of fabric up (cutting takes forever!) and I made some more.

Okay, I made 11.

I’m officially the SWF (Single White Female) of sewing. But later today, I am going to my first meeting of the school year and I’m dreading it. It will give us at least a few moments of fun when I plop these on the table and let everyone pick one.
See the red, white & blue pouch? That one is special. A friend of ours recently got her U.S. citizenship finalized and will be sworn in this month. I’m so excited for her, so I made her a little patriotic pouch to help celebrate.
p.s. Like the little lion? He’s probably older than me. He used to be in a drawer in my grandparents’ house that we’d play with during our visits. Anna loves him now. I just think he’s adorable and it’s amazing he still works.
p.p.s. I have no idea what’s going on with my quotation marks. It’s driving me crazy.
Closing question (if you sew): How much fabric do you buy if you see something you like but don’t have an intended project yet? I need some guidelines!
Don’t forget about my giveaway! It ends on Friday- hope you can take a moment to leave a comment to enter! Click here to check it out.
Something needed to be done. Before I get into this let me preface everything by saying that eventually we are going to do a complete overhaul on our house. We are actually meeting with a contractor this week to talk about what we could do and how many thousands of buckaroos we would need in order to do what we’d like. Michael and I like to brace ourselves early. It won’t happen for quite some time, but we need to dream a little and take in the big picture.
Anyhoo, our front entry way has what some would call a security gate. It also functions as a screen door, so while my first reaction was to rip it off the house, I realized that then we couldn’t leave the door open for a nice breeze, which you can do nearly 365 days/year where we live. I like to keep tabs on my kids and my dog, so there’s another nice function of the security gate. Also, lizards like to invade our house from time to time (I can’t tell if it’s different lizards or the same lizard that is stalking us, be he/they are not nice and he/they bite if given the chance. Neat, eh?), and when we first moved in we heard coyotes howling in the night, too, so there are LOTS of good reasons to not get rid of this thing until we have a nice replacement.
Here’s the “before” shot. Brace yourself!

Black is not exactly a welcoming color. It may say, “I’m a security gate.” But it also has sort of a “go the he** away” vibe to it, too. I’ve been itching to paint it since we moved in, but other things took priority. With the school year looming and other things on our horizons, I decided it was time to do it. So, this last weekend I taped everything off, primed it up…..

And Voila!

(don’t worry, Sophie isn’t dead- she’s just old.)
It looks much, much better. I’m not entirely sold on the color- maybe should have done a darker brown to match the door, but at least it’s not black anymore. If you are blessed with a security gate circa the 1970s and need to spruce it up, you will need at least 5 cans of spray paint, lots of drop cloths (light ones- heavy ones won’t stay up), painter’s tape, and depending the color you may need some spray paint primer, too. I actually need to get one more can and touch up some areas, but we’ll see how important that becomes once school starts… 🙂
Did you notice anything else about the entryway?

If you haven’t seen, you can enter my first giveaway to win a sign similar to this one for fall. I plan on making one of these for each season, and a few holidays. Click here to enter. Hoooray! I’m very happy with how this helps our entryway- it’s so nice to have some color and fall colors, even though it’s not really fall yet.
The only thing left for this area (for now) is to fix that lovely overhead light. We have one to put up- I’ll post a picture once it’s done, but that’s Michael’s territory- I’m not allowed near the electric work for good reason. We’d also like to tile up the cement, but that will depend on our eventual plans for the house- we’re not going to tile it now if we may rip it up in just a few years.
p.s. Check out this guy- he was hanging out in our small woodpile in the corner. I’m glad I saw him before I moved the wood- he was HUGE!
 Do you have an entryway? What would you like to do to it?
Some of my friends who read this blog regularly (I love them for that) may be wondering how this little huge blog challenge I’m doing is going. If you have no idea what I’m talking about, click that little button on the right (under the subscribe button) and you’ll find out what I’m talking about.
Well…technically today is day 29 and I’m working on Day 25. I’m behind. But I’m not quitting- just catching up. Whew! It’s been a challenge in many ways, but mostly just keeping tabs on everything in addition to daily life has been the biggest one. I did decide to switch my domain over, revamp the theme a bit, and do some other background stuff that no one will ever see that took a ton of time. But I’m proud of doing this challenge- it pushed me just like my trainer pushed me in my pre-marriage & mommy days.
Day 25 Day’s task is to ask a question, and my question is a simple one: how do you stay true to yourself and who you are? I’ve seen lots of blog moms post about this lately. Blogging can give readers a sense that people are more than they are. Take Design Mom, an extremely successful woman with 6, count ’em, 6 kids (who are gorgeous). I was reading her blog, clicking page after page, oohing and aaahhhing, and thinking, “Oh my LORD this woman is Super Woman!” Then I started getting down on my own situation- my house isn’t perfect enough, my wardrobe isn’t cool enough, I’m not wearing enough makeup and I certainly haven’t gotten far enough with my crafting yet. Then I clicked Design Mom’s FAQ page and found this little tidbit, which really resonated with me:
“…And the answer is: I don’t. Not even close. In fact, on some level, I believe the whole idea is a myth. If my blog is really good on a given week, then you can bet my house is a wreck. If my blog seems a little bleh, then it’s guaranteed we’ve got a lot going on at home. If you know me in real life, then you know I work in my pjs as often as possible and that I’m a very typical mom. As each new child joins our family, I have to learn to be a more flexible and lower my expectations another notch.
…One more thing. Please keep in mind that on this blog I attempt to keep things very positive and showcase the best and prettiest things happening in my life. That doesn’t mean there aren’t bad days and failed projects and lost tempers. At the end of the day, blogs are a show. I suppose that’s why we like them so much.”
It made me feel so much better. And it got me to thinking that blogging, while amazing, is misleading. We see all of these wonderful things, but as Gabrielle points out, people rarely blog about the real stuff. Blogging is, for me, one way to see the good things in my life, and to make good things in my life. It would be easy, though, to get lost in comparison and start feeling like you don’t measure up.
So, how do you stay true to yourself? Do you limit your blog-self to a certain amount of blogging per day? Do you ride the different waves of life and take it as it comes or plan it out to keep it sane?
For me, I try to remember that while I truly love this new blog (and have completely neglected my family blog and family photos this summer), I have to take a breather or it gets the best of me. I’ve asked my husband to keep me in check. School is starting soon, and then my time to craft/sew/create will be even more limited by the fact that I have to bring home a paycheck for another 9 months. I do worry about balancing all of this, but it will all work out in the end- it always does. I have to focus on life day-by-day, and not get wrapped up in the politics of teaching or who I need to please. Other than planning doctor appointments and social dates, I have no long term goals mapped out on a calendar. Maybe that needs to change, but right now I’m doing good just keeping up. I need to please myself, my kids and my husband, and everything else is small potatoes.
I bought a ring recently- I can’t wait to get it in the mail. It says, “Be true to your dreams.” That is going to be my mantra this year as I set out to start a creative life and finish my teaching life, if only for a while.
I’d love to hear how you stay true to who you are in your day-to-day life. Any tricks? Words of wisdom? Little vignettes to share? Post ’em here- I’d love to do a recap!
p.s. Did you enter for my first giveaway? No? Click here– you have until Friday the 20th! I’ll announce the winner on Saturday!
Product Review: Ironing Pad
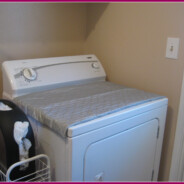
I hate ironing. No really. I hate it. I know of some people who love certain household tasks (my mom and my brother-in-law love to vacuum). I have yet to find one that I look forward to. That being said, I love a product that makes any household task easier or better or faster. This one that I have found does all of these things. I love it.
We are blessed with a laundry room in our house, which is great. Not having laundry in the garage seems to be an anomaly here in SoCal, so I was really pleased to know I would have a designated space for laundry and a place to keep chemicals and other things up high. However, our laundry room is pretty narrow, and an standard, run-of-the-mill ironing board would not work. I didn’t want to use our guest room or another room for ironing because I’d never take it down, so we’d always have piles of fabric and clothes needing to be ironed, and one more thing to do. Up to this point I’ve been either a) avoiding ironing all together or b) using our old, over-the-door ironing board. It’s loud- when I take it down it’s creaky, and when I iron it’s creaky. The board itself is too small, too.
I wasn’t exactly in search of anything, but then I was looking through Improvements catalog and found this. (Improvements is one of those catalogs that you never know what you’ll find when it shows up. Lots of great things for your house, and then as you’re flipping through it they spring things on you like the “health and intimacy” pages- oh my.)
I love this thing. It’s the answer to my ironing prayers.
Here’s my dryer before:

And here it as after- this was a great “forced organization” for me- I reassigned some things in about 10 minutes to make way for the pad (okay, and I also finally put away the carpet adhesive). Now the dryer is always clear. Love it!

What I love it for best is pressing/ironing fabric that is ready to be sewn into something. I throw all the fabric behind the dryer and pull it forward as I’m ironing, like this:
 (Sorry about these photos- they were taken at night.)
It’s great. I have to shift it to the left or right as I go, but I still get ironing done so much faster, and having nothing to pull out or set up makes it so great. I wouldn’t say I love ironing now, but I’m enjoying it much more than I used to because of this thing.
So far it’s held up great. The only place I’ve noticed with any wear and tear is when I ironed some very small parts of sewing projects to press them, the area around it did show some heat damage. Also, when it comes it reeks of plastic, so if you’re sensitive to smell you may want to open it outside and let it air out before bringing it inside. Last possible negative is that it covers the lint filter on my dryer, so I have to remember to clean it. If you have a fancy dryer like the one I dream of I’m not sure where the filter is, so it might not be an issue for you.
I think for $13 you can’t beat this thing. I’m wondering if one could make one on their own with more fun prints or something. Maybe I’ll add that to my list…
Happy Weekend!
About Natalie
 Life is crazy. Craft it well. Thanks for stopping by Crafting Crazy! I'm stumbling into a new sort of life after leaving a 12-year teaching career. More of a practical crafter, I'm trying to temper the perfection a bit. If I mess up, I’ll be sure to share- then we can laugh together. Here you'll find anything I like that makes my life better or fun. Crafts, of course, but also posts about food, home decor, exercise... whatever I'm dabbling in at the moment. I'm so glad you're here- thanks for stopping by!
 Content Brewing!
Ready to Rock?

I’m a Clever Girl!
SITS-stahs!

Chronically Distracted


This work is licensed under a Creative Commons Attribution-NonCommercial-ShareAlike 3.0 United States License.
Keep Up With the Crazy