


Hi, I’m Natalie. Some people call me Nat. That’s cool, too.
I make stuff. A lot. It’s part of who I am. I’m a crafty person, not by choice, but by DNA, I think. I love Mod Podge, but I also knit, sew, paint, and am dabbling in lots of other things. That’s not all you’ll find here, though. I love food, I’m in the process of completely readjusting my eating habits, and I love a good (easy) party. All this is to say, my blog is about stuff I do.
I am also a mom to three cute kids, ages 5, 3, and nearly 1. You’ll see them sprinkled throughout in my posts. They come first, so you’ll rarely see me post daily, and that’s okay with me. I’d rather give you good stuff than fluff.
You’ll find that I’m part Martha-Stewart-Wannabe, and part realist. Nobody can be Martha except, well, Martha herself. And while I love perfection, I also love the process of getting there just as much. I screw up a lot, and will be sure to let you know so you can laugh- either at or with me, depending on the scenario.
To get you started at Crafting Crazy, here are a few of my favorite posts:
I recently painted my kitchen chairs.
I Mod Podged fabric onto a table and it looks rad.
My hall closet is always organized (even if the rest of my house looks like crap).
I made our duvet cover. It took forever.
If you’re still reading, some other things I can tell you:
- I’m a bit accident prone. Okay, I’m a klutz. Glue guns and signs are particularly dangerous for me. Yup. You read that right. Oh, and car doors.
- I love my husband. His name is Michael. He tolerates me, and my propensity for crafting and injuring myself on a regular basis, with grace and patience. He is amazing.
- I love my kids. If you’d like to check them out, you can read my family blog here.
Thanks for checking out my blog, and if you have one yourself please let me know so I can pass on the karma. 🙂
I am so overwhelmed. I think my brain has hit its capacity. Between figuring out Twitter, managing followers and somehow adding followers, joining BlogFrog, committing to the challenge, trying to craft/sew, evaluating my blog and where it’s going, completing the tasks in the challenge and wanting to accomplish EVERYTHING I am, well, overwhelmed (oh- and remaining a decent mother & wife, to boot. And friend.). You know that feeling you get when you’re reaaaaallly excited for an upcoming, happy event? Like your wedding day, or the birth of a child (yours or someone else’s), or a big party or something like that. You get that build up, that “something big is coming feeling,” or that, “crap- I have so much to do I hope I get it all done” feeling. That’s me. There’s so much I want to do, so much I want to accomplish.
Add to that the fact that I have just a few weeks left of summer and then I begin my final year of teaching. I am dreading that on many levels. I don’t want to teach anymore, but we need me to teach just one more year. I am sure it will all be fine, everything will work out, and one year from now I will look at this post and laugh. Hard. But right now I am so excited, stressed, and, oddly happy about this summer. I’m achieving so much, yet have so much more to do. The best part is that I’m really excited about blogging. True to my header, I really have no idea what I’m doing in several areas, but I love it.
That, my friends, is rad.
Whew! Thanks for the vent. On to Day 8!
p.s. If you’re wondering what I did on Day 6- we had a ton of reading. If you’re wondering what I did for today, Day 7, click here. Or look up above and note the new pages I’ve added to this here blog. 🙂
This blog challenge is great- it’s really helping me, step-by-step, understand this new world of blogging. In my family blog I post about things mainly to help my distant family, both extended and immediate, keep up with what’s going on. I also have a wonderful group of mommy friends who blog (check out my blog roll on my family blog). We all read each other’s blogs, and I think (and hope) it will keep us in touch when all of our kids are in school and our lives get even crazier.
But this blog is different, and I want to make something of it. And blogging to achieve and audience and perhaps, someday make some money off of it is a completely different ballgame.
Today’s task in the 31 Days to a Better Blog Challenge is simple: email someone who comments on your blog. It also talks about the importance of communicating with readers and writers of blogs you like. Here’s where my confession comes in….
I’m a lurker. (Is that a word?) I lurk.
I LOVE to read blogs. I LOVE to get ideas from them. I LOVE to laugh at witty remarks and stories, to ache for bloggers who are going through hard times, to wonder at other people’s lives. But I rarely comment. I think this parallels my social life, too. I’m really shy in situations where I don’t know people in gatherings. I’ve had to work hard to extend a greeting or introduce myself to someone I don’t know. My friend of 10+ years, Jane, is the exact opposite. She doesn’t know a stranger. I’ve benefitted from that for quite some time- 10 years in fact (thanks, Jane!).
When I read someone’s blog I am often in awe- there are so many wonderful writers. And even some who don’t write well, necessarily, but their lives captivate me in a beautiful way. I have a hard time thinking that my comment would add anything to their world. I think I’m wrong, though.
So my confession is also going to turn into a conversion, I guess. I need to start commenting more. I started when I got into SITS a while back, and try to remember, but my new credo is going to be that if I visit a blog, I shall comment upon it. It might be short and sweet (I really love the word “rad”!), but at least I’ll leave a comment. When I think about it, it’s rather silly to want people to comment on my blog and not expect to comment on others in return. What goes around comes around, right? So here I go- off to comment.
I’m off to dig through my comments and email some peeps, because it truly is nice to receive comments on your blog. You spend time putting it together, and when someone takes the time to read it’s amazing.
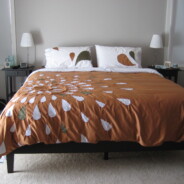
This is going to be a long post. I hope you read it and validate my psyche, because after this project, I need some validation. Whew! I am, however, totally okay with you just looking at the pictures and then posting a comment (ha!).
This project started a long time ago in my head. Michael and I have been dreaming of getting a king-sized bed for months and months. When your husband is 6’3″, you need a big bed. In mid-June Michael noticed that Macy’s was going to have a stellar sale on mattresses and said we should go ahead and do it. I was so excited and petrified. We chose gray for our master bedroom, and while I like the gray, I’ve had a hard time deciding what to do with the bedding. I don’t want more gray bedding- to dreary and plain. And supposedly gray is neutral, but I think it’s a tricky neutral.
I did have two sources of inspiration. I saw this photo in a magazine and loved the look of orange, white and gray on the walls. (My dog is cuter than that dog, BTW.)

Then I saw this photo in (you guessed it) Martha Stewart’s Encyclopedia of Sewing and Fabric Crafts. It’s on page 150/151.

(I took this photo with my iPhone and hope I don’t get in trouble for posting it, but couldn’t find it online anywhere).
I didn’t like the idea of having a white comforter. With a little black dog who likes to snuggle in our bed while we get ready in the morning, I could just see it getting covered with little black hairs. And Michael and I are hard on things- white would just get dingy and dirty too quick. But the tones in Martha’s book were a bit too muted for me- I wanted something a bit more striking.
I headed to BB&B and found some sheets. I chose a copper color- it was as close to orange as I could find. I did like it a lot. I wanted to add a second color as an accent, so I chose an olive green that was near it because they just seemed to go together. What follows is a sort of pictoral journey, if you will. But if you don’t want to scroll through them, I’ll put the finished product first to save you the scrolling (aren’t I nice?). 🙂 Ta da!

(Please don’t look in my closet– it needs some work. Should have closed the dang curtain…LOOK AWAY!) I think the white pillows made it look complete. I love it. Really, I do. I’m just not sure about the color combo with the gray walls.
Now, onto the process….ah, the process…
One of the wonderful things about Martha’s book is you get templates and patterns. Lots of them. This particular template was a doozy, though, since it’s soooooo big. Many pages to tape together. I also used that to cut out the teardrop templates.


I set to cutting out the appliques. There were a lot of them. It took me an entire morning- I caught up on a lot of Oprah. The process outlined in the directions basically tell you to use the template to trace the pattern onto your sheet with transfer paper and a tracing wheel. Transfer paper is also… a doozy. I even bought the same transfer paper used in Martha’s book- you can find it here. I wish I could tell you that I love transfer paper and it worked like a charm. I do not love transfer paper, and it did not work like a charm. After 45 minutes of tracing the pattern onto my sheet, I pulled it away and there was very little to show for my lower back workout. So I had to resort to my own brainpower because I wanted to get to sewing. Bad. What I ended up doing was placing the appliques and tracing them with disappearing ink. I learned, however, that on this particular sheet at this particular time of year, the disappearing ink disappears quickly- overnight. So I worked one circle at a time. I placed the appliques on the inner circle and then sewed them down. Then I worked my way out from there.
 Tracing paper (and Sophie, wondering what in the world I’m doing)

One of my learning moments was the stitching for this project. Martha’s book talks about using a satin stitch, but I couldn’t find anything in my sewing manual about satin stitching. So I zig-zagged the appliques to the copper sheet (Martha and her editors said that would be okay). Let me tell you- a king sized sheet- that’s a lot to work with. This was my world for several days:

Things moving along…

Here was my problem, though- sometimes the zig-zags turned out okay (pre-trimming)…

And other times they pulled away- either due to my poor stitching skills or they just pulled out of the threads- a little bit of both. When I saw this happening, I became a bit depressed. I spent so much time on this project, and felt like it wasn’t going to pan out. Then (enter angel chorus music) I asked my friend Kari for help.

Thankfully, Kari didn’t have to make a special trip- she was already coming over for a get together. I brought her back to check it out and she set me straight on how to satin stitch. Basically you set the zig zag setting on your machine at opposite ends to make it as wide and as close together as possible, and ta-da! Satin stitch- looks much better, eh?

Once I finished up the satin stitching (several days later) I was finally ready to make the duvet. I followed the directions in Martha’s book on page 147. I’m glad I took my time with this part. My white sheet was significantly larger than my copper, AND they were both larger than my comforter, so I had some work to do.

Ready to sew it up!

Up close in our room.

And the final product again. *sigh* I love it.
31DBB Day 3: Promote your Post
I am so excited about this challenge. Excited and overwhelmed. I really want to make the most of it, which is why I decided to write a new post for the Day 3 task. My list post was okay, but didn’t really relate to Crafting Crazy very well, so I’m choosing to promote my preceding post instead. I just finished signing up for Digg, and posted my article there. I’m curious to see what happens- if I get more hits, etc. I’m also going to see if I can convince a few blogging friends to link to me. I need to try link parties, too- haven’t had the brain power to figure them out yet.
Go 31DBB!
I love Martha Stewart. For a while I was in denial. I was one of those people who was all like, “That Martha- she’s too perfect. Who really lives like that? I mean, it’s nice and all, but…..” Then I couldn’t deny it any more. I just like the look of nearly everything in her magazines. I don’t watch her show very often mainly due to a lack of time, but I do like the simplicity of the Martha Stewart Style. So, I gave up, gave in, and now I’m a Martha Wannabe. I have a long way to go.
Enter her new treasure, “Martha Stewart’s Encyclopedia of Sewing and Fabric Crafts.”

Soon after I purchased my sewing machine I went out and bought this book. (Thankfully I had some help with a generous gift from our PTA at school- it was Teacher Appreciation Week and we all got $50! Nice, eh?) I actually went to Barnes & Noble and pulled a bunch of sewing books and literally sat on the floor and drooled over patterns and pictures of things I’d love to know how to make (remember- no idea what I’m doing). I ultimately chose this book because it has a little bit of everything- clothing, gifts, doggie coats, you name it.
I thought it might be nice to showcase what I make from this book. It’s one thing to look at a project in any book and say, “Hey- that’s rad. I could make that.” It’s another thing entirely to follow the directions (I’m not always good at that) and see if you actually get what’s pictured. And since I’m such a novice, I think at the very least I will give a good laugh, right? So here we go: Installment #1 of, “Martha! I made it!”
On page 311 in the book are “Felt Baby Shoes.” They looked adorable, and awfully simple to make. First I just went to Michael’s (or Joann Fabrics- can’t remember) and bought a cheap sheet of crafting felt in pink and white. I wanted to see if they would turn out right using the pdf pattern included with the book. In less than 15 minutes I had an adorable pair of shoes, but because the felt only cost 29 cents/sheet, I could tell they were not going to last very long. So I headed to the back of the Encyclopedia and looked up where Martha got her felt. I love the back of the book- you can look up where they purchased certain fabrics and such- not everything is listed, but in this case I was lucky. I surfed over to Magic Cabin and ordered some of their wool felt. When it showed up I started drooling it was so nice. And here’s my end result:
First and most importantly, meet Clare. Isn’t she adorable?

Clare’s mommy, Elizabeth (E for short) agreed to let Miss Clare model my shoes. Of course, Clare gets to keep them, too. I wanted to see if they would actually fit a baby’s foot. For reference, Clare is 3 months old.
Here are the shoes- I think they turned out adorable. You’ll see that I added a little heart to the bottom of one for flair. I know- I’m so forward-thinking, right? No one does that, I’m sure. Ha.


And now my critique of the directions and steps in the book. I think these will be helpful to anyone else in case they decide to make something from this book.
This How-To was great– the pattern was easy to use, the felt is very easy to work with. I do need to buy some smaller pins because I did stick myself a lot since I only had standard size pins. I used a 1/16″ punch for the little holes just as they described and it was very easy to use. I have to wonder if gluing rick-rack, as they suggest would hold up, but that will have to wait for another pair.
Other notes: In the future I will not use buttons. These shoes barely fit Miss Clare, so these are best used as a newborn gift so that mommies can decide when to use them. Because Clare is 3 months old, the buttons had to be readjusted a bit and they did work, but I would worry about the felt not holding up to her little kicks and such since the fit was a bit snug around her cute ankles. Clare was also kicking up a storm, so they were hilariously challenging to get on. I did use a crafting knife to cut the button holes- it was very easy, but I’m glad I used the sharp knife and not a pair of scissors. This allowed me to be more exact.
A few other photos to share:
The shoes on Miss Clare’s adorable feet (this girl has long toes!)

Full shot- I feel horrible for cutting off her head, but still- is she not just the cutest? Talk about baby fever… E said that she wore them for quite a while and didn’t seem bothered by them at all, which is also nice to know.

Thanks, E, for letting me use Miss Clare! I can’t wait to see what other shoes I can come up with. I have all sorts of color combinations in mind.
Next up on Martha, I Made It!: a duvet cover. Yikes. It’s coming!
If you got this far, please leave a comment and show me some love- thanks!
This is Day #2 of the 31DBB challenge (see the button on the right to get more info!).
I’ve been wracking my brain with this one, trying to think of a list that I could share that would be helpful and worthy of someone else’s eyes and time. Something that came to mind is what I have in my bookmark bar in my browser. This is such a useful tool that, until recently, I didn’t realize could be so helpful in my day-to-day technological life. So while this may not be a crafty post, it certainly keeps my crafty self a bit more organized.
If you’re a new techie and don’t know what the bookmark bar is, there is a bar that runs across the top of your browser window to which you can add the places you most commonly visit on a daily basis online. If you’re a tab-o-holic like me, I like to have several tabs open at once, and these buttons make it easier to jump from place to place with less typing and more surfing.
Here’s a screenshot of my bookmark bar, in case you still aren’t sure where to look:

So, you’ll see a few of mine listed above, but I’ll go ahead and list all of my bookmarks here. I’ve linked them up if necessary/helpful, and given them a description in case you aren’t familiar with them.
- Yahoo: About once or twice a day I click on Yahoo to mentally check out of my world and see what’s happening in the rest of the world.
- Google Maps: Because everyone should know where they are going.
- Cozi: I’m not completely sold on Cozi yet, but my husband and I are trying it out as a means to coordinate when the school year starts out. Jury is still out.
- Picnik: If you’ve never tried Picnik give it a whirl- you can do so many cool things with photos in a simple way. It’s like Photoshop for dummies.
- Blog Frog: If you’re a SITS-tah- holla holla! This is a great place to find online communities. This is how I heard about the 31DBB challenge.
- Facebook: duh.
- Something for Sanity (my family blog)
- Crafting Crazy (you’re reading it now!)
- Big Tent: I’m part of a local group of moms, and Big Tent is where we meet up online to have online forums and arrange get-togethers. It’s a great tool if you need to gather a group, and you can also start online groups across the country/world, I imagine.
- All Recipes: This is my go-to site for finding recipes. I love having a recipe box, and now their “pro” app on the iPhone lets you access your recipe box on your phone- no more cooking with my laptop above the range or scrawling down recipes on post-its. One step closer to paper-free!
- Bank: I’d give you my bank info, but then I’d have to kill you.
- Pingg: I’ve started using Pingg instead of Evite for invitations to things. My friend Kari turned me onto it and I love it.
- Mobile Me: I’m a Mac girl, and Mobile Me keeps my world connected via my iPhone. I also love to use it to share photos with family- no clogging inboxes anymore.
- Ravelry: If you knit, you should check out Ravelry. Tons of free patterns and communities, and you can find a local group to knit with if you want!
- Kaboodle: Do you Kaboodle? With Kaboodle you can dream of things you want, or keep track of things you need, or a combination thereof. Kaboodle is like the ultimate registry for your family. I have a list for my kids, myself and my husband. Then, if I see something online and think, “That’s rad! I want that!” I add it to my Kaboodle list.
- Add to my Kaboodle: This is a button you can add to your bar- see something you like? Click the button and add it to the list you like. When you’re done it takes you back to where you were- awesome! You can get this button on the Kaboodle main page- scroll to the bottom and look for “get the buttons.”
I just realized I need to add Twitter to my bar- off I go!
That’s it! Hope you find something you like!
Go 31DBB particpants!
Hi everyone!
I am posting something in two places on my blog in an effort to make sure my blog “homework” is done. You see, I’ve joined in a 400+ women movement to seek to improve my blogging skills. In the next 31 days I will be posting EVERY DAY. That’s right- every day. This is a huge commitment for me, but I think it will be worth it. Below is my first assignment, which is to write an “Elevator Pitch.” This is meant to promote myself and my blog by describing who I am, what my blog is, and why people should read it. I’ve also posted it in my “About Nat” page, because it will stay there until I need to change it. I’m so excited to do this challenge, and hope that I can rise to the occasion! If you want more info about the 31 Days to a Better Blog Challenge, you can click here.
My short elevator pitch is simple: Crafting Crazy: An Adventure in Threads.
Here’s my long elevator pitch:
My name is Natalie Chiles and I am Crafting Crazy. The “crafting” part of Crafting Crazy comes from my newfound lust interest in making anything I can. I have always had a creative side, but lately it just seems to keep coming even when I’d like to take a break. The “crazy” part of Crafting Crazy comes from several places. The biggest one is that while I have a lot of creativity ready to let loose, I would not consider myself an expert in the newest craft I have taken on: sewing. I mess up. A lot. But I feel that messing up is often the best way to learn. (Hopefully I won’t waste too much money in the process) My hope is that, through this blog, I can show others that learning is the key, not perfection. I am a lifelong learner, and I’m not embarrassed to make mistakes (most of the time), so I will post the good, the bad and the ugly for all to see. I’d also like to use this blog as a way to track my journey as I take on this new crafting life and hopefully generate some products that might make other people ecstatic.
Some other parts of the “crazy” in Crafting Crazy:
- I don’t follow directions all the time. Need to work on that.
- I knit.
- I can be a bit obsessive in some areas.
- I bake sometimes. I used to bake all the time, but now that I have kids I think I’ll be baking a lot more. I will post cooking and baking things from time to time because I do feel that food is a craft all unto itself.
- I scrapbook, though I haven’t in quite some time. Perhaps some of that will come through in my projects- we’ll see!
- I recently moved into a house that needs lots of TLC without lots of cash. How does one solve this? One gets crafty, I think. Home improvement posts will also show up here and there.
Please check out my other blog here. I wanted to start Crafting Crazy because I don’t want my kids to have to sift through posts about their childhood and come across eight million posts about sewing, crafting and cooking in the mix. I hope they’ll thank me later.
Thanks for stopping by! Please leave a comment if you do- I love to know when people are reading my posts!

….or WAS I even thinking? Not sure. I will have more to post about this soon, but thought this might entertain some of my crafty friends. If you hear moans and groans of frustration, it’s probably me.

The Mantle Refurb
I recently posted about our house, displaying a ridiculous amount of photos of it. I didn’t show too much of our mantle/fireplace area because I knew this post was coming. This area of our house needs some major remodeling, but we’re going to have to wait for a while before we can get to it. When we were doing the major clean-up before we moved in, one thing I did was paint the brick fireplace a clean white, which really helped. I couldn’t get past the mantle- it has been used and loved and now, as you can see below, it is covered with scratches and wear and tear. I have longed for a mantle for years, but was a bit deflated with this one because it is just plain tired. And who can blame it? It’s probably about as old as I am!
Before: tired, scratched, worn, you get the idea
(Do you like the Kleenex boxes stacked to the left of the clock? I think we were winding up a “sickie” phase at the time of sewing. And those are Anna’s play cupcakes to the left.)

I headed to our local Home Fabrics store. That place is dangerous! I bought a ridiculous amount of fabric and got to sewing. I am so (sew) happy with the end result. It was really easy, too- I’d show a tutorial or something but I was too dang excited to get this thing on and I didn’t take any pictures. I love how it hangs, how it looks, etc. I thought I might have to hot glue it on there, but the frames and such seem to be holding it on just perfect. The other thing I did (not shown) was I sewed a secret pocket on one end to stash our keys for the gas fire-place. They were always hidden behind a frame and I was worried they would get lost.
After:

Basically I cut a realllllly long piece of the fabric to cover both the top and the overhang. I finished the sides and then folded them over and hemmed them. Then I cut two squares for the ends and sewed it all together. Hooray for improvisation! Now we just need to decide what to hang above the mantle. Someday maybe we’ll have a flat screen up there, but for now…. Any ideas?
Props to the crafting ladies
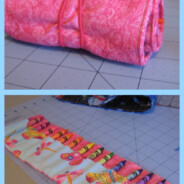
I am in awe of some of my friends who craft so well. One of the reasons I started this blog is because I was honestly a bit jealous of the abilities of some wonderful women I know, and some women I don’t know but who I stalk on a regular basis via their blogs.
A few months ago my friend Kari, who sews the most beautiful things, posted about making gifts for children. I saw these crayon rolls and just had to try them. I have now made four, and I know that I will be making more. There is something so satisfying about choosing two fun fabrics, getting a few supplies together and having your end product be so cute AND usable. I can’t give Kari all the recognition, though, because Kari actually got the idea from Lindsey at The Pleated Poppy and now I am hooked on yet another blog!
So thanks, Kari! Thanks, Lindsey!
Below are my attempts at making the crayon rolls. And Lindsey is right- the best part is sliding the crayons in when you’re almost done. (Here’s a link to Lindsey’s tutorial in case you want to make them for yourself.)
I made two with a “girly” theme. I love, love, love this button- I want to get more of it.

Note my tags that I ordered, too- I got them from Lisa at MommieMadeIt on etsy.com. Love them! I also love the two “boyish” ones, too. Hopefully you can’t tell in these photos, but I actually didn’t get the crayon pockets perfect on either of these two. Something about the dark fabric made it hard. I had to use tailor’s chalk to mark the lines so that it would show on the black. I was probably rushing through it. But the crayons still fit, and I know that the 2 recipients of these will not care. For the next set I will be more careful! Scout’s honor.

About Natalie
 Life is crazy. Craft it well. Thanks for stopping by Crafting Crazy! I'm stumbling into a new sort of life after leaving a 12-year teaching career. More of a practical crafter, I'm trying to temper the perfection a bit. If I mess up, I’ll be sure to share- then we can laugh together. Here you'll find anything I like that makes my life better or fun. Crafts, of course, but also posts about food, home decor, exercise... whatever I'm dabbling in at the moment. I'm so glad you're here- thanks for stopping by!
 Content Brewing!
Ready to Rock?

I’m a Clever Girl!
SITS-stahs!

Chronically Distracted


This work is licensed under a Creative Commons Attribution-NonCommercial-ShareAlike 3.0 United States License.
Keep Up With the Crazy