


Le Diner à San Diego: An Experience!
… A few months ago I heard about this amazing evening event in San Diego: Le Diner à San Diego. It sounded surreal, to say the least. The location was withheld until hours before it started- and I love a good mystery! Everyone was to wear white, dress elegantly,...
Read More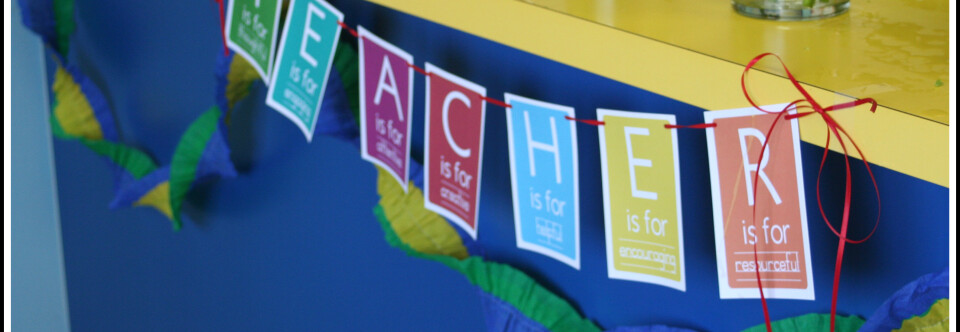
Teacher Appreciation Week
… I love a good Teacher Appreciation Week. When I was a teacher this week couldn’t come at a better time; it was usually during a crazy, hectic spring-is-insane kind of week, and the parents at our school always did an amazing job of making us feel loved and...
Read More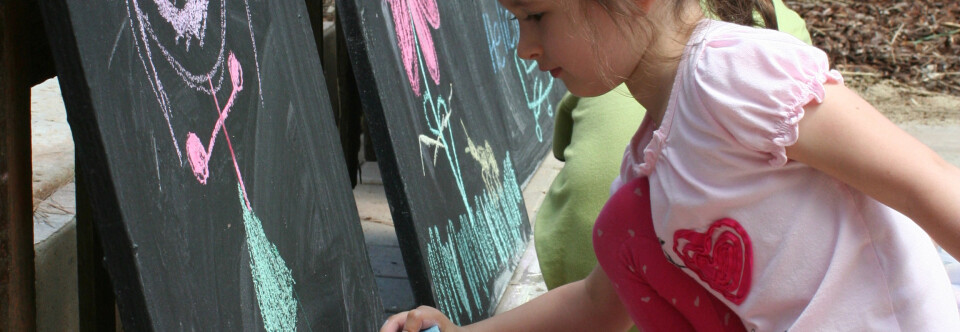
DIY Chalkboards {Summertime Fun!}
….. I want this summer of 2012 to be one my kids remember. I want it to be fun. I also want to be able to say to them, “Go Play Outside!” as often as possible. I have lots of memories of being sent outside to play when I was growing up. There’s...
Read More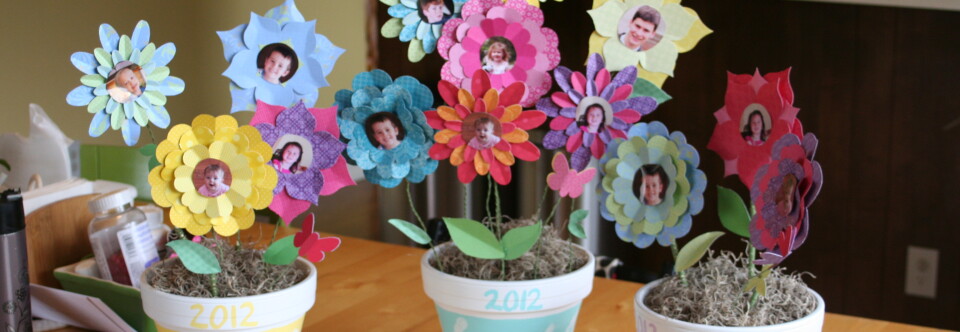
Mother’s Day Project & San Diego MNO!
Are you ready to clean up your Pinterest Boards? Thursday is Clean Up Your Pinterest Boards Day! Join us and make sure your pins are legit! Can’t wait! Are you ready for Mother’s Day? I am! I love having a day to celebrate the fact that I’m a MOM!...
Read More
Jack’s Party: Scavenger Hunt!
I wanted something easy for the kids to do during the party, and since I was hopeful that it wouldn’t rain and we have a pretty big yard, I wanted to keep them outside for at least part of the time. I started by searching on Pinterest for “boy parties” and...
Read More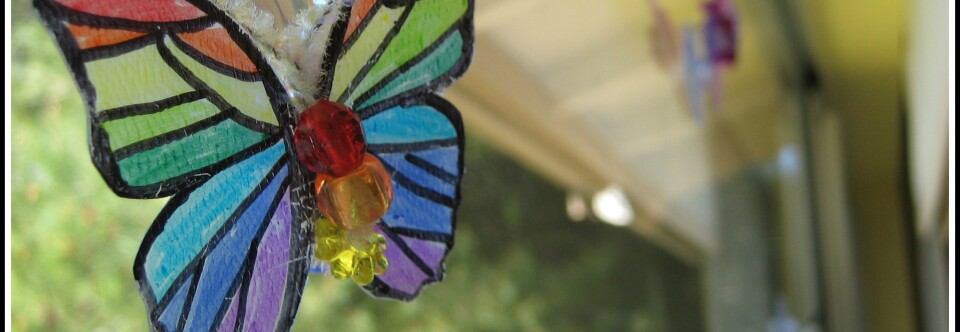
Pinterest Projects: Butterfly Window
Maybe I should call this “Butterfly Week”? {For my fellow Pinterest Pals: Please do NOT pin this post! Please go the the original post, linked below, and pin her original content. I want to blog and pin with integrity, and I am not the original person who thought...
Read More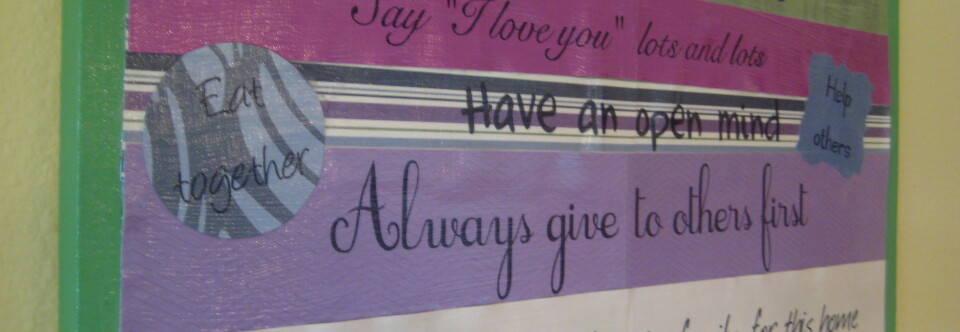
Jane’s Family Rules
Yesterday I introduced you to my wonderful friend, Jane. Jane’s birthday is in May. It is now January. Why does that matter? Well, it was in May that I told Jane that I’d make her a set of family rules for her home. And just this past weekend I finally...
Read MorePinterest Projects: Butterfly Window
Maybe I should call this “Butterfly Week”?
{For my fellow Pinterest Pals: Please do NOT pin this post! Please go the the original post, linked below, and pin her original content. I want to blog and pin with integrity, and I am not the original person who thought of this- she deserves the credit. Thanks!}
I saw this post, pinned it on my Pinterest board, and wanted to tackle it immediately. As in, “We-must-drink-all-the-milk-so-I-can-prep-this-project” immediately. Alas, I had to gather a few of the supplies, so it was not that quick. It was most excellent to have a valid excuse to buy a huge pack of Sharpies in lots of colors. Who doesn’t love Sharpies, right?

I was so happy that I did this with Anna. Truth be told, she only did the coloring, and she wore out much sooner than I did, but still- she did a few and it was fun. And she loves them. Every once in a while she will say, “Mommy! Look! There are real, live butterflies in our window!” I’ll say, “No way, really?!” And she’ll say, “No, silly, they’re just pretend.” I’m going to miss four. Four really is fun.

The only thing I will add to the excellent directions on the original post, is that putting these in the window has caused most of the colors to fade. The yellow faded within a few days. The magenta color hardly budged, though- must be something in the pigment. It was easy to take them down and touch them up, though. I love them for this time of year. So fun. Make some. Make them right now- you can thank me later.

Happy Weekend- my son turns three today, so there will be party posts forthcoming!
Read More
I fit some sewing in a few weeks ago and am so happy with what I ended up with. My kids had a few toys that needed to be contained. Some blocks that needed a better/cuter home than a Ziploc bag, and Connectagons from my mom at Christmas time.

I knew just where to go for what I needed. My friend Kari’s blog, Handmade Mommy, has a lovely tutorial on fishing reel drawstring bags. I thought they’d be perfect for the kids because they are easy to open and shut, and you can make them whatever size you need. Here’s my final product:

Aren’t they cute? I lined the inside with white flannel just to keep them a bit thicker and sturdy.

These blocks look so much better in a cute bag, don’t you think?

Thanks so much for the tutorial, Kari!
Read MorePinterest Projects: Butterfly Canvas
Ever since I saw this post on Whatever, I have wanted to do this project with my sweet little Anna. The moment I saw it I added it to my “Things I’d Like to Make” board on Pinterest. Anna loves butterflies, paint, and crafts. I wanted something for our craft/office/guest room over the bed. While I’m not totally pleased with the yellow I ended up with on the canvas, I do love the effect and the bright colors it brings to the room.
Here’s our paper pre-butterfly punching. The act of painting the colors itself was therapeutic. I’ll let you guess which one is Anna’s.

I bought three different butterfly punches (used a coupon for each one), and all of them were Martha Stewart brand. They all worked so nicely.

I didn’t let Anna help with the hot glue- something about 4-year-olds and hot glue doesn’t go together for me. But the end result is lovely. I may move it to Anna’s room when I figure something else out for this wall- it doesn’t seem quite big enough, but we’ll let it sit for now.
I would advise a few things:
- Get yourself a nice set of watercolors with lots of color options. I did a first round with just the Crayola watercolors and the effect wasn’t as nice.
- Use nice watercolor paper. It’s very thick and dries better.
Happy butterfly creating!
Read More
My first guest post! And a getaway.
Today is a special day in my blog history! I am guest posting over at a favorite new spot of mine, Chronically Distracted. The two lovely ladies who put this place together, Wendy & Maegan, are also the two who introduced me to “The Happiness Project” by Gretchen Rubin. How did I not know about this book? Apparently I was living under a rock (or raising three kids and had no time to read). Wendy & Maegan put out a request for guest posts, and I decided to take the leap. It’s amazing how much harder I work on a post when it’s going up on someone else’s blog- it’s much more nerve-wracking. So, head on over and get yourself some time-management info!
And lastly, Happy Friday! I’m so excited about this weekend. My sister, Stephanie is here, and this is what we will be doing most of the weekend:

(click photo for credit)
In PALM FRICKIN’ DESERT, baby. Yeah. Uh-huh.
I will likely not post until we’re back, but since the forecast actually calls for rain (in the desert?) we’ve decided that we may geek out on our computers all weekend. You know you’re a computer geek when the thought of working/playing on your computer uninterrupted for an entire weekend it totally appealing. 🙂
Happy weekend!
Read More
I’ve had it on my mind for a while to do a large post about changes Michael and I are trying to make in our eating habits (there are tons), but that post is never going to get written. I can just tell. So instead, I’m going to share tidbits of things we’re doing that I’d consider “small steps.”
 If you know me, you know I love sweets. I’m a person who leans towards creamy, sweet, and rich. Those are my vices. I go nuts for brownies, rich ice cream flavors (no vanilla for me unless it’s covered in something decadent), and glorious cakes. I love sugar.
For that reason, I knew I needed to give up some things because I’m not getting any younger, and my metabolism is certainly not where it used to be.
The neat thing (for me) is that my body actually made my mind up for me. Throughout my last pregnancy I drank a Diet Coke nearly every day at lunch. It was my afternoon caffeine shot to get me through the rest of my teaching day. I new it wasn’t good for me, but it wasn’t like I was downing a six pack every day- just one. As soon as I gave birth to Emily it was like a switch went off. Soda no longer sounded good to me. I think I had one a few days after I came home from the hospital out of habit, but I didn’t enjoy the taste at all. It was weird.
 I decided to try natural sodas. But after a few weeks of that I just asked myself, “What’s the point?” I was failing to see any reason to consume something that had zero nutritional value whatsoever. At least with a bowl of ice cream I’m getting some calcium- what’s soda givin’ up these days? Nada.
I haven’t looked back since. And even better, I’m now one of those snooty people who likes fizzy water. It’s delicious.
I haven’t dropped tons of pounds or anything, but I do feel better knowing I’m not drinking it. I don’t miss it, I don’t crave it. Every once in a while I’ll have a 50/50 lemonade/Sprite combo if we’re out to lunch or something, but that’s it.
And what I really, really don’t miss is the oodles of soda cans in the recycling bin, as well as the unpacking of the soda after grocery shopping. That was always a pain in the ass.
Have you given up a vice?
Read More
Have you ever noticed how easy it is to feel deflated after surfing around the blogosphere? Or even the internet in general? Don’t get me wrong- I love a good Pinterest session as much as the next person, especially when I’m looking for ideas and inspiration. But there are moments where I have to catch myself and say, “Whoa, there, Nelly. Simmer down.”
It is so easy to look at all of the beauty that people create, organize and put out there, and then walk away thinking, “I’m not enough. I’m not doing enough, I’m not making enough, I’m not DIY-ing enough, I’m not _______ enough.” And you know what I think?
Enough is enough.
So I’ve decided to start a new series here on Crafting Crazy. It’s called “Nobody’s Perfect.” In this series, I’m going to share with you my imperfections. Things in my house that look horrible/crazy/disorganized/imperfect. Projects that fail. Anything that isn’t perfect is fair game. My goal? To help dispel the perfection myth that seems to be so easy to buy into.
I want to make things because I like making them. I like the process. I like the journey. And if, in the end, I come out with a beautiful project to share, rad. If I don’t, it’s okay.
So for our first installment of Nobody’s Perfect, I give you… our front yard. If you’re new to CC you may not know that we live on about 2 acres of land. A lot of it is undeveloped and we have grand plans for it once we win the lottery can afford to make it into something useful like a raised garden extraordinaire, or add more citrus trees, or something- anything, really. This part of our yard is what you see as you pull up to the house or drive on the lane that runs the length of the property. Needless to say, we’ve been a bit busy with a big project in another area, and our yard… well… just have a look-see:

Some of the weeds are taller than my son. For reals. He’s almost 3. When he and my daughter go out and play right now, I have to remind them, “Watch out for the gopher holes!”

I think I’ve seen our neighbors actually shake their heads in dismay as they drive by. Really. They love us.

Here’s a wider shot of our lemon tree, which I wrote about recently. We also have six pine trees on our property- all of them are Torrey Pines, and they all started as Christmas trees when my husband was growing up in the very same house we’re in. Cool, huh?
Here’s something else that’s not perfect, but I’m totally in love with it. This wagon. My husband got it from a neighbor’s garage sale last week. It’s OLD. Rusty. It’s probably been so lonely, and now it has a new life. Right now it’s primary job…

Pinecone holder.

And one last bit of imperfection. I thought this was a really strong weed. Nope. It’s a baby tree. Poor thing. We’ll have to cut it down because it’s too close to our entry sidewalk.

*I should mention that I was most inspired by this post from Heidi of Crafterminds. I read this post when it came out and it’s stuck with me ever since! Thanks, gals!
Read More
It’s time to get craftin’ around here a bit more. I have been spending the last few weeks really cleaning out my craft room and getting it organized. It’s getting to be pretty awesome. Now all that remains is plowing through some projects so that I can clear off the bed, since the room is also technically a guest room.

I’ve had this little drawer organizer for over 10 years. It’s one of the first things I ever bought from IKEA, and it’s one of the only things I’ve bought from there that did not require assembly. I LOVE assembling IKEA furniture. I’m weird like that.
I decided that since we are going to be in this house until our kids are grown and in college, it’s time to commit to spiffing this thing up. I also organized all of my office stuff, and purged a lot, so it’s much more feasible to use this in a logical way. The little orange tabs you see above are what I used to temporarily label the drawers while I pondered what to do with this thing.
You may or may not have seen my sewing & crafting organizers, but this is the same fabric. Here’s my before and after; below you’ll see a bit about my process. Doesn’t it look soooo much cooler?!

To prepare the fabric, I measured the width of the drawers. I know that fabric tends to stretch a bit when you use it with Mod Podge, but I also wanted a wrap around on the drawers, so I added about 1/2 inch to the measurement. I pressed my fabric in the middle of the pattern- you can see the crease below. Then I measured the height of the drawers and cut very precisely. I actually had to do this twice because I messed up and Mod Podged a piece on upside down. Whoops. Note: once you put the fabric on, it’s never going to be the same, so if you mess up, you mess up. It’s best to have extra fabric for this project, unless you are perfect in every way. Ha.

I knew that I’d be working on this in spurts, so I labeled the pieces of fabric with the corresponding drawer and also an arrow to remind me which was way up. To do this, I used tailor’s chalk so it just brushed off before I Mod Podged. I didn’t want to leave anything to chance- that’s dangerous for me.

To attach the pieces, I applied a layer of MP to half of the drawer face, pressed the fabric down, and gave it a good rub down. Then I did the other side. Before the MP dried, I also poked a hole where the drawer pulls would go back in later. I just used a sharp pair of scissors. On the right, below, you can see the little bit of fabric that wrapped around the edge. These were stubborn- I had to hold them down for about 30 seconds while the MP did it’s work. I coated the top of the fabric with two coats of MP.

For the top, I measure the fabric and cut to size. There’s a metal trim, and the fabric stretched over it, so after it dried completely I used an exacto knife and trimmed it off. I coated the top with Hard Coat Mod Podge, and then sprayed acrylic sealer on it (just one coat) so that it wouldn’t be tacky on the top where I am putting some often-used supplies.

The drawers I labeled with vellum so that the pattern of the fabric wouldn’t be interrupted. I just love it.
Click here to see all of my Mod Podge projects!
Here’s the before and after again:
Also, you may have noticed my sewing machine cords back there on the left. I stuck two 3M Command Strips to the wall and I hang my sewing machine cords on them. That way, when I’m not using my machine and it’s covered up, the cords aren’t under the table getting in the way. Genius, right?! 🙂

Read More
About Natalie
 Life is crazy. Craft it well. Thanks for stopping by Crafting Crazy! I'm stumbling into a new sort of life after leaving a 12-year teaching career. More of a practical crafter, I'm trying to temper the perfection a bit. If I mess up, I’ll be sure to share- then we can laugh together. Here you'll find anything I like that makes my life better or fun. Crafts, of course, but also posts about food, home decor, exercise... whatever I'm dabbling in at the moment. I'm so glad you're here- thanks for stopping by!
 Content Brewing!
Ready to Rock?

I’m a Clever Girl!
SITS-stahs!

Chronically Distracted


This work is licensed under a Creative Commons Attribution-NonCommercial-ShareAlike 3.0 United States License.
Keep Up With the Crazy