


Hi, I’m Natalie. Some people call me Nat. That’s cool, too.
I make stuff. A lot. It’s part of who I am. I’m a crafty person, not by choice, but by DNA, I think. I love Mod Podge, but I also knit, sew, paint, and am dabbling in lots of other things. That’s not all you’ll find here, though. I love food, I’m in the process of completely readjusting my eating habits, and I love a good (easy) party. All this is to say, my blog is about stuff I do.
I am also a mom to three cute kids, ages 5, 3, and nearly 1. You’ll see them sprinkled throughout in my posts. They come first, so you’ll rarely see me post daily, and that’s okay with me. I’d rather give you good stuff than fluff.
You’ll find that I’m part Martha-Stewart-Wannabe, and part realist. Nobody can be Martha except, well, Martha herself. And while I love perfection, I also love the process of getting there just as much. I screw up a lot, and will be sure to let you know so you can laugh- either at or with me, depending on the scenario.
To get you started at Crafting Crazy, here are a few of my favorite posts:
I recently painted my kitchen chairs.
I Mod Podged fabric onto a table and it looks rad.
My hall closet is always organized (even if the rest of my house looks like crap).
I made our duvet cover. It took forever.
If you’re still reading, some other things I can tell you:
- I’m a bit accident prone. Okay, I’m a klutz. Glue guns and signs are particularly dangerous for me. Yup. You read that right. Oh, and car doors.
- I love my husband. His name is Michael. He tolerates me, and my propensity for crafting and injuring myself on a regular basis, with grace and patience. He is amazing.
- I love my kids. If you’d like to check them out, you can read my family blog here.
Thanks for checking out my blog, and if you have one yourself please let me know so I can pass on the karma. 🙂
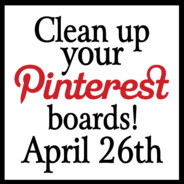

The time has come. Someone needs to say it.
As a Pinterest Population, we are getting sloppy, friends. We’re pinning and repinning and we’re not doing right by each other.
You know what I’m talking about- I’m sure it’s happened to you: You see something you like on Pinterest, and when you go to repin, the source is not direct. Maybe it’s a Google image of a project you would be interested in, and there’s no link provided; just a lovely picture. Maybe it’s an awesome top you’d love to buy, but you have no idea where to find it. Regardless of the type of pin, the source is all out of whack.
Let’s talk about your boards, too. Are they organized? My boards have an organized facade, especially since Pinterest started letting us choose covers for our boards. But underneath…. there’s a whole bunch of chaos going on.
The pinning party is over.
It’s time to get real.
On April 26th myself, Wendy at Wendy Will Blog, and Ashley at It’s Fitting, are dedicating the whole day to cleaning up our Pinterest boards. We’re going to take a day to reorganize, refresh, and yes (gasp!) we may even delete a few pins. We’re calling it Clean Up Your Pinterest Boards Day.
Want to join us? Here are the details:
On April 26th, devote as much time as you can (within reason) to not pinning, but doing a digital clean up of your own Pinterest boards. If you plan to participate you can grab the button in my sidebar and post it in your own sidebar to help spread the word. You could even write a post about it! We will also be using the hashtag #CUYPB2012 if you are a Twitter geek rockstar. You could also pin the button onto a Pinterest board to spread the word on Pinterest itself!
“But what does it mean?” This will be different for everyone. Everyone uses Pinterest for their own greater good, so do what feels right. Hopefully, in the end, we’ll help future pinners because they will repin legit pins, and we’ll save ourselves some headaches, too.
Some things to help you out if you’re not sure where to start:
{Check Sources}
Do your pins lead you to the correct place? Do they lead you ANYwhere? If you click on a pin and it takes you to Google or some other search engine, right back to Pinterest, or if you get an error message… it’s not pinned correctly. From here you have to decide if it’s worth your time- either find the original source and update your pin, or delete it.
{insert record scratching here} “Wait, you mean I have to go through all my pins and check them all?”
That’s up to you. But think about how many times you’ve seen something on Pinterest and just pinned it instantly without checking the source. Not only is that not fair to other pinners, it’s horribly unfair to the person who created the content you are pinning.
If editing all of your boards is overwhelming, consider just working on your biggest board. Then you could go back and work on smaller boards as time allows.
{Update Descriptions; Make Pins More Searchable}
Do you have any bad pinning habits? Pins are not very searchable (and therefore not very useful) if you just write “Love this.” Or “OMG! So cute!” Go back to those pins and write “Love this headboard for my bedroom” or “OMG this leather Coach purse is so cute!” Also, if your pin comes from a blogger of any kind, consider adding the name of their blog to the description. They worked hard on that post and are proud that you pinned or repinned it. It would be nice to give them credit. For example, when I write a description for a pin from a crafting blog, I will type, “I love this teacher appreciation gift @ Skip To My Lou.”
{Update Your Board Covers}
It’s easy to do, and it makes it easy to visually distinguish them from other boards. If you haven’t done it yet, read this.
{Update Your Followers}
Take a few minutes and look through people who are following you. You can see all of them by going to your main board page and clicking on your number of followers. You’ll see everyone who is following you. Is your aunt on there? Maybe you should follow her back. Your best friend from college? I bet she’d like you to show her some love, too. Take another few minutes and follow some new people.
When you’re done you will feel like you’ve completed a digital spring cleaning of your Pinterest boards. You can pat yourself on the back, and then pin with more knowledge. Be sure to keep up your good pinning habits so that we can keep Pinterest a great place to be!
If you’re going to participate and are a blogger, please copy the code for the button in my right side bar (towards the top). You can add the button to your sidebar or post and help spread the word however you like- Facebook, Twitter, Pinterest itself, or any other venue you choose. Not a blogger? You’re still rad! You could share this post on Facebook to let others know.
Remember, our Twitter hashtag is #CUYPB2012.
Hope to hear from you on April 26th! I’m looking into having a linky party and lots of tweeting!
Have you ever needed a break? It could be one of many varieties.
- A break from your kids.
- A break from your job.
- A break from your house {cleaning}.
- A break from your pets.
- A break from the rigamaroll of life. Yeah. Rigamaroll.
- A break from _____________. What would you put in the blank?
This week I’m taking a break from posting. If you have a blog, you know what I’m talking about- there’s a lot of behind-the-scenes action that goes into {what I think is a} good blog. You have to keep things organized, cleaned up and accessible. I have some virtual housekeeping to do. I’d like to think I can do what I need/want to do AND give you lots of great posts, but hey- I’ve got three kids, a dog, a husband, and a WAH gig. Something’s gotta give, right?
So this week, while I will be “blogging” a lot, I will not be posting a lot, if at all. But be sure to check back next week- I have something big up my sleeve! Especially if you are a Pinterest user!
Regardless of what holidays you do or don’t celebrate, I hope you had a great weekend, and that your week is fabulous. See you next week!
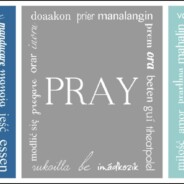
As I blog more and more, there are definitely projects and posts that I am most proud of. This is going to be one of them- mainly because this project took me for. EVER. I hope you enjoy and can use some of these printables!
Eat. Pray. Love. It’s a book. It’s a movie. I saw the movie long after it came out and was prepared to hate it. Really hate it. I do love Julia Roberts… I just found so much inspiration and encouragement in the book; I didn’t want to like the movie because it couldn’t possibly live up to the book. But it did. At least, it did for me. I love both.
A few weeks after seeing the movie I was still thinking about both the book and the movie, and had this idea. When it came to me I went to my Facebook friends for ideas of languages to use (thanks, friends!). Then, following the suggestion of a few more friends, I used Google Translator to finish things up.
I learned a lot in this process- a LOT. Accents, Photoshop, framing, printing- you name it. I’ll share a bit below about a few things, but first, here they are! You are welcome to download and print whatever you want, but please do not sell or manipulate these files. While I have grouped them together in threes, maybe you just want one or two for different places in your house- it’s up to you! If you look below you’ll see that I printed one trio for our kitchen and I LOVE them- a nice pop of color.
Here they are grouped together. I just had a few color combos, then I left the project for a while, and when I came back I wanted more options, so I added more. (If you want to download, scroll waaaayyy down.)
Simple black and white

Pinks & a deep burgundy (good for Valentine’s next year?)

Subtle blues and gray (more…)

I’m linking up today with the ladies at Chronically Distracted and their Happiness Project. I LOVE the prompt for this week!
{As I type this post my husband is reading bedtime stories to our children. Love.}
This month we are looking at love. Our prompt is to write about our first date with the love of our life. Done!
Michael and I met online. Catholicmatch.com to be precise. Before meeting him, I had been doing the online-dating thing for at least 18 months, I think. Match.com. CatholicSingles.com. eHarmony. Now that we have three kids together it all seems so funny, but in the months before I met him I was so. Tired. Of. Dating. I have some GREAT crappy date stories.
I told a friend of mine that I was done with online dating, and she encouraged me to continue just a bit longer because she met her husband online, and didn’t want me to give up just yet. We have her to thank for our marriage, really, because just a few days later, Michael messaged me.
We emailed. It was nice. He seemed friendly, and his picture was intriguing (he has a Van Dyke, which I liked). He asked if he could call me, and I said yes. We talked on the phone a few times, and finally, just before the holiday season started, he asked when he could see me.
Since we were both Catholic and I was playing in my church’s Sunday night choir at the time, I asked him if he’d meet me after mass and we could have dinner. My memories of that evening are very blurry now.
I remember being so excited to meet him, and taking forever to decide what I was going to wear. I remember playing through mass and wondering where he was, if he could see me while I played . I remember him coming over afterwards, helping the group tear down our sound equipment. I liked his smile. I remember walking to dinner, and him telling me that he didn’t feel well, but he wanted to meet me, so he was powering through.
What I can’t remember: anything we talked about at dinner.
I do remember that I smiled a lot, and we made each other laugh. We walked the main drag of Pacific Beach after dinner and talked. He walked me to my car. I loved that he was so tall. He seemed incredibly smart and sensitive, in a good way. We hugged.

About four and a half months later we were engaged. Six months after that? Married. On our honeymoon, which we took over the week of Thanksgiving, we marveled that we had just known each other a year and we were already hitched.
I love my man!

Children’s Music: A Review!
Hello friends!
You may or may not know that I was an elementary music teacher not too long ago. There are many things I don’t miss about teaching, but I do miss having wonderful moments with kids. They can make you laugh so hard, and seeing their brains light up on a daily basis is always fun.
Recently I was sent a copy of a CD for kids called “Be Happy: Fun Music for Fun Kids.” This CD is associated with Positively Kids. I absolutely love the message this CD brings to children. It actually is a reminder for me in my daily living to “keep it happy,” something I’m working all year (and hopefully beyond that, too).

On “Be Happy,” we are introduced to Captain Positive, an adorable dog, who helps children laugh their way to a better mood and choose to be happy. Fourteen tracks, some familiar and some new, lead us down a path of learning to choose our attitudes (and make it a good one!).
When I first received the CD things were too busy for me to give it a focused listen, so I waited. When I had time to sit down and really listen I was most impressed with the overal uplifting feel of the whole album. But I knew the real judges would be my kids.
I had clicked around the site and found this video of Captain Positive singing about the things he loved, so I invited the kids to watch it a few days ago. Needless to say, we watched it five times, I think. If you take a cute puppet like Captain Positive, a clever song, and then you sing it again really fast: you have children in the palm of your hand. We have also listened to the CD in the car and it is a new favorite as we toodle around town.
What I love most about this CD and the people behind it is that they are helping kids learn about their feelings, that it’s okay to have negative ones, and that it’s also up to them to stay in a foul mood or choose a better, more positive one. That’s a valuable lesson for not just children, but all of us.
Well done, Positively Kids!
You can check out Positively Kids on their Facebook Page, Twitter, and Google Plus.
*Note: I was sent a copy of this CD in exchange for my review; all opinions are expressly my own.
If you’re new to Crafting Crazy, check out this post to find out about my new series, Nobody’s Perfect.
I have said numerous times how much I despise flat surfaces sometimes. All they do is attract clutter. And more clutter. One of my biggest aspirations is to live a life free of clutter. To have systems that work for our family in not only keeping us organized, but also clutter-free. Note: I said aspiration.
The reality is that clutter comes with kids unless you really stay on top of it and make it a priority. I do make it a priority when I know we’re having people over in large numbers, or especially people we don’t know well. We can’t have them thinking we’re normal, right?!
So here’s my imperfection for this post: our kitchen counter. We have an old, circa 1970s kitchen, complete with avocado-green oven and cooktop, wood paneling, and white formica countertops. My husband grew up in this house, so there’s lots of history here. History, however, comes with tired appliances and countertops that stain if you don’t clean them up immediately. We are blessed, though- we have a home.

This photo was taken just before Valentine’s Day. For some reason I thought it would be fun to have Anna make all of her Valentines, complete with letter stickers for each child’s name. Yeah- nice idea in theory. I also love the over-ripe bananas. The box at the end of the counter was a lovely Valentine goodie box from my sister in Kansas. There are craft bowls, water bottles… you name it. Ooo- I even see some pipe cleaner creations.
On a good day this counter has lots of space. And it’s clean. Those days, however, are rare. It’s the catch-all of the house.
Where is your clutter zone?
Jack’s Party: Food, Treats & a Wrap Up
For our final installment of Jack’s party, we’ll talk food, treats and I’ll give my thoughts on throwing a “real” party. 🙂
So let’s start by saying that I am not a party-food creator. I have serious personal issues making a bunch of pretty food that is only going to be chewed up and digested. Yes, it must taste good, but that’s sort of where my sense of obligation ends. Presentation of food is not my strong suit.
Given the number of people we had attending, we ordred giant pizzas. That was our “main course.” They came shortly after the scavenger hunt ended. We also had some snack packs of goldfish crackers and snack mix available for empty tummies.
I also made fruit kabobs. I went to Costco, bought a bunch of fruit, and skewered it up the day before. One tray was all the same, with a little bit of everything. When I got tired of making those I made another tray that had a bit more variety so people could pick and choose. What I love about these is that you don’t need utensils. I’m all about the finger food. Also, Costco had 12-packs of old-school soda- I couldn’t resist. Everyone seemed to like them, too! The kids had juice boxes, and we also had water available, and some Izze drinks, too- love those.

For cake, Jack was sooo easy. I didn’t really give him a choice on the cake vs. cupcake front. We were having cupcakes. But when I asked him what kind of cake, he said (in his adorably funny voice), “Ummmm, I fink… I waaaaant.. chalk-a-LOT!” Done. “What kind of frosting?” “Ummm, I fink….. white.” Done and done.

I followed most of what I described in my mini-cupcake post. This time I tried Trader Joe’s cake mix and I have to say I will not be using it again. They didn’t taste bad… they just didn’t taste that great. I saw lots of cupcakes with the frosting licked off and just a bite or two of cake. Bummer. Back to Duncan Hines I go!

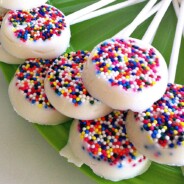
I made candy-pops just because. Yup. Just because. They were SO. EASY. TO. MAKE. For reals. Check it out:
- Buy a mold (or two to make it faster), candy melts, and sticks (mine were 6″). Sprinkles worked very well for these, too. I got it all at Michael’s.
- Melt candy melts and put in a pastry bag or a ziploc bag will do just fine- cut off the tip. You may need to let it cool a bit as (duh) you did just melt it over the stove.
- While it cools, put sprinkles in the bottom of each mold. Make sure the bottom is covered well- not too much, not too little.
- Fill the molds with the melted candy, smooth them over with the back of a spoon. Doesn’t have to be perfectly smooth.
- Place the sticks and put them in the fridge or freezer until solid.
- *Important: check the sticks a few minutes after you put them in the fridge or freezer- sometimes they come up a bit, and once the candy starts to solidify (ooo- I just said solidify) you can push them back in and they’ll stick better.
- Pop them out and store. Put on a cute tray to serve, or wrap them up in little bags for take-home treats.

Lastly, each kid got to take a little treat bag of M&M’s home. I got the ribbon at Dollar Tree, and the bags are from Shop Sweet Lulu. I LOVE these little bags. They are so stinkin’ happy. 🙂

I got all of my trays at WalMart for ONE DOLLAR EACH. Go now! They are cheap but they are colorful and perfect for whatever. And I don’t care about what happens to them because they were only…. a DOLLAR.
And now… the wrap up. Will I do this again? Maybe. I think if I do another party like this it will be next year for a different child, that way everyone gets a super-special party once every three years or so. March is a huge birthday month for us- 10 people in my family/extended family have birthdays, so we have a lot going on. But it was so fun to have happy, cheery decor and everyone seemed to like it a lot.
I have the utmost respect for anyone who can do this for every child’s birthday, especially if they have more than one child. I’m also thankful that Anna doesn’t seem to expect the exact same party for her birthday, and we will keep it much more simple (I hope).
I will be back later today to create a “Jack’s Party” page and get everything properly linked up so you can go between posts easily. Thanks for reading!
Here’s one last shot of the birthday boy…

And again, many thanks to Tonya for sending me so many photos, including this one of my husband and my daughter, Em. These posts would not have been the same without her photos. You’re wonderful, Tonya!

VLOG! Chronically Distracted & the Happiness Project Update
Helloooo there to all of my friends participating in the Happiness Project! I am so thankful to these two ladies, Meagan and Wendy, for having such a fabulous blog. They are awesome.
Check out my video. It’s a bit long, but I think I make some good points. And you can also see how my brain works because I birdwalk juuuuuust a wee bit. That’s okay. It’s all good. 🙂
For some reason the sound is better than the video- my lips don’t seem to keep up. Oh well.
Can’t wait to link up and see what others post!
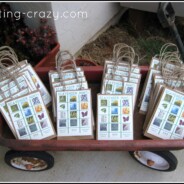
I wanted something easy for the kids to do during the party, and since I was hopeful that it wouldn’t rain and we have a pretty big yard, I wanted to keep them outside for at least part of the time. I started by searching on Pinterest for “boy parties” and such, and happened across a scavenger hunt. The only problem was that it wasn’t suited for our environment- I think it was a beach hunt. After a bit more searching I realized I just needed to spend some time in Photoshop. It really didn’t take long to make.

Each bag had a little magnifying glass tied to the handle (purchased from Oriental Trading), and I also stuck a pencil in each bag. Then they could use their pencil to mark things off (or their parent could), they could collect a lemon from our lemon tree, and whatever else they wanted to keep. Recognize the wagon? 🙂

When they were done, I let them choose between one of these or these as a prize. I didn’t “enforce” too much- but lots of them were so proud of finding everything on the page. It was super cute!
Some tips if you decide to do a scavenger hunt:
- Don’t get too specific if your crowd is younger- keep it simple.
- Don’t hand out the bags until AFTER you give directions- otherwise they will likely just take the bags and run off without really knowing what to do.
- Expect it to take just about 20 minutes or so, maybe a bit longer.
- Advise guests to wear appropriate footwear- we put it on the back of our invitation. Our yard is not one for flip flops at this time of year.

Here’s my birthday boy and his daddy during the hunt. My two men. (Note the gopher holes in the foreground.)

As an aside, the other thing we had that ended up not working as well was the Giga Ball. (It cost way less wherever I got it, but can’t remember where.) I love this thing! It’s the best money I’ve spent for parties and gatherings/play dates. We intended for everyone to do it as they arrived (before food consumption). Unfortunately on this day it was so damp outside that everyone (including my husband) started getting too wet and muddy, so we had to put it aside. Later it came out again after the sun burned off some moisture. Some kids like being rolled down the hill. Others…not so much. Either way- it sure is a fun thing to have around!

Below is the hunt. The tree with the question mark is for “Which tree is the tallest?”. The “???” is for if they find something that’s not on the page. “Take one of each” is for our citrus trees- we have three (lemon, orange, and grapefruit) but we ended up only having them pick lemons because the other two have lots of bees right now. The grasshopper was just an example of a bug. You’re welcome to download it. I’d appreciate some pins or comments if you download it. Thanks!

Up tomorrow: Food and Wrap-Up!
Also a big thanks to my friend, Tonya, again for her lovely photos that add so much to these posts!
Jack doesn’t really like any one particular character enough for me to be able to say, “Oh, we’ll have a _______ party.” He is just now getting into Toy Story, he loves helicopters and motorcycles, but he’s not totally obsessed with any one thing just yet. Well, except one thing. Balloons.
About six months ago Jack got a balloon. We went to the dentist. He screamed the whole time because of a chipped tooth trauma from a while back. He hates the dentist. But when he got that balloon his whole demeanor changed. And when we got home, all he wanted to do was play. with. his. balloooooon. And so, the love affair began.
The balloon obsession, combined with the fact that about 90% of the time Jack is one happy boy, I decided to just throw a party with some fun balloon decorations and keep it happy. That is, after all, my theme this year.
Just a reminder that I’m saying thank you to my friend, Tonya, for all of the pictures she took. You’ll be able to pick her work out because I thank her in all of the pictures that she took. 🙂
First, I made this balloon wreath. If you search “balloon wreath” on Pinterest you will see lots of examples, but I was particularly drawn to this one at Landee See, Landee Do (say that three times fast). I decided that I want this wreath to be a family tradition. We are going to hang it on our door for each child’s birthday, and I’ll make a new center circle for it for each child on each birthday. Now that the main work of making it is over, I think it will be easy to keep up with.

I didn’t use ribbons the way Landee did and like the simplicity of it. I may go back and throw in more purple- we’ll see. I ended up with very few purple in my bags for some reason. I bought the balloons for this wreath at Dollar Tree; I think I bought 8 bags but only used about 7. These balloons are cheap for a reason- if you blow them up they are super tiny. Doesn’t matter for the wreath, though. 🙂
In her post Landee says her thumb was sore for days- I must have tough thumbs. However, I did make this over a few nights, not all at once.

For the center circle I just made a graphic in Photoshop Elements and cut it out with a circle cutter. The font, if you’re interested (I love it) is Ribbon from Lost Type. I used the coordinating ribbon and attached it with more floral pins to the top. I also hung the wreath with wire and covered it up with ribbon- it is rather heavy and I wasn’t sure if the ribbon could hold it alone. Just looking at this wreath makes me smile, and Jack loved it.

The other decor that I just loved were the balloons themselves. I’ve seen these big balloons so many places and just loved how different they looked. They are HUGE. I got them at Shop Sweet Lulu. They ship very quickly- both orders I placed for this party were shipped the same day I ordered them, and each order came with a piece of taffy. Yum! I’m sold.
One thing I will say: these balloons took all the helium I had. How much did I have? I had two Balloon Time tanks*; one was used from a previous party and one was brand new. By the time I filled up all three of these balloons, the helium was g-o-n-e GONE. I think next time I will call Party City and see how much they’d charge to fill them up.

The balloon banner was made the night before and slept in our playroom. I woke up before the kids and hung it outside on our newly-paved patio (my husband is awesome) and was elated with how bright and cheery it was. I was inspired by Design Mom, and you can find her tutorial here.
While I didn’t get a raw thumb from the balloon wreath, I did get raw fingers from tying off all of these balloons!!! My husband would have helped but he came home with back spasms the night before Jack’s party so I let him rest so he could be my work mule the day of the party. It was really easy to make.

In Design Mom’s post she uses an upholstery needle. My moment of desperation was laying out all of my balloons, getting my string (she used waxed twine but my plain ol’ string worked great, too), and realizing I wasn’t sure I had a needle that would work. Then I went through my knitting supplies and found my plastic yarn needle and it worked perfectly. What’s even better- I didn’t have to worry about popping the balloons because there was no sharp metal tip to wield. Hooray! Time-wise, start to finish, I think this took me about an hour and a half to make. Totally worth it- when Jack saw it he said, “Mommy, my balloons! My balloons!” He loved it.

Lastly, I made these streamers:

I saw these on Made, and Dana’s tutorial was great. I could spend hours on her tutorials alone. I wasn’t even planning on making them and then when I was at Walmart getting a few things I saw them and thought, “Oh, what the hey, I’ll give it a try.” It was a bit cumbersome at first and then I found my magic tool: a wooden spoon. Dana had a dowel, I think, in her tutorial, and she used it to keep her streamers from getting tangled up. I didn’t have a dowel, so I went with my longest wooden spoon and it was perfect. You hit a rhythm after a while, and then just as you think, “Hey! I’ve got a rhythm going here…. ” …your bobbin runs out of thread. I rolled these up and will use them for other parties. They are so cheery and fun!

In case you’re wondering how long the big balloons lasted in terms of float-i-ness… the green one popped in the wind the next day, but orange and red lasted from Saturday to Monday night. We brought them inside and the kids were in heaven playing with them. This is them on my birthday on Sunday:

Up tomorrow: the scavenger hunt!
*I did NOT pay the price you see in that link to Walmart for my tank. If you get them in-store they are much cheaper!

About Natalie
 Life is crazy. Craft it well. Thanks for stopping by Crafting Crazy! I'm stumbling into a new sort of life after leaving a 12-year teaching career. More of a practical crafter, I'm trying to temper the perfection a bit. If I mess up, I’ll be sure to share- then we can laugh together. Here you'll find anything I like that makes my life better or fun. Crafts, of course, but also posts about food, home decor, exercise... whatever I'm dabbling in at the moment. I'm so glad you're here- thanks for stopping by!
 Content Brewing!
Ready to Rock?

I’m a Clever Girl!
SITS-stahs!

Chronically Distracted


This work is licensed under a Creative Commons Attribution-NonCommercial-ShareAlike 3.0 United States License.
Keep Up With the Crazy